Installing linux on windows-bioinformatics analysis
July 26, 2019Installing linux on windows-bioinformatics analysis
Virtual Machine (VM)
VM is a completely isolated guest operating system installation within a normal host operating system. VM allows you to have two or more OS in one physical PC machine. You can install linux, OS X, Windows Vista, Windows 98 on a VM.
Linux
Bioinformatics depends heavily on Linux-based computers and software. A lot of good scientific software is written specifically for Linux/Unix. Additionally, Linux has most popular programming languages (e.g.Python, Perl, C) already installed and ready to use! Data management happens swiftly with the dedicated text manipulation tools and file system properties.
Ubuntu
Ubuntu is a free and open-source Linux distribution based on Debian. Ubuntu is officially released in three editions: Desktop, Server,and Core.
System requirements
A minimum of 512 MB of RAM.
1 GB of RAM or more is recommended.
Software requirement
Virtual box
Ubuntu iso
Installation Process
The first thing you have to do is obtain VirtualBox. Visit the VirtualBox website’s download page. Install it the same way you would any normal Windows program.
Follow these instructions to get a Ubuntu disk image (.iso file).
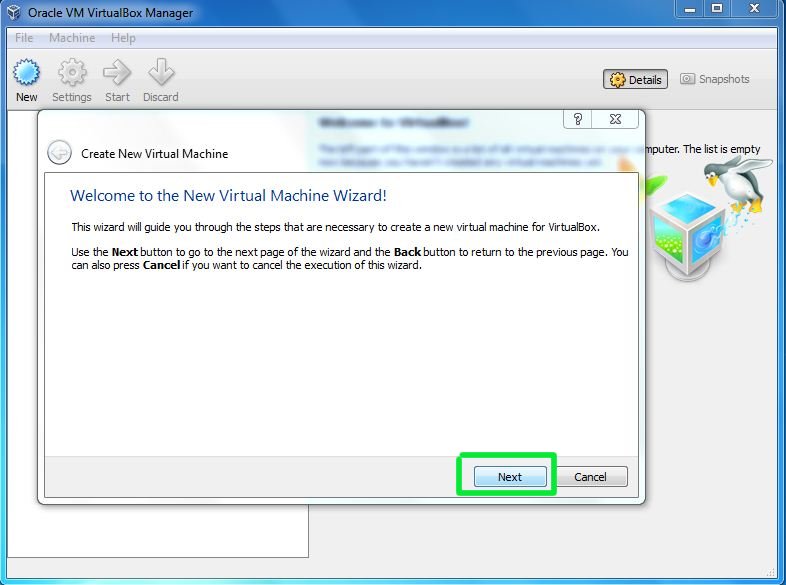
After you launch VirtualBox from the Windows Start menu, click on New to create a new virtual machine. When the New Virtual Machine Wizard appears, click Next.

You can call the machine whatever you want. If you’re installing Ubuntu, it makes sense to call it Ubuntu, I guess. You should also specify that the operating system is Linux.

VirtualBox will try to guess how much of your memory (or RAM) to allocate for the virtual machine. If you have 1 GB or less of RAM, I would advise you stick with the recommendation. If, however, you have over 1 GB, about a quarter your RAM or less should be fine. For example, if you have 2 GB of RAM, 512 MB is fine to allocate. If you have 4 GB of RAM, 1 GB is fine to allocate. If you have no idea what RAM is or how much of it you have, just go with the default.
Click Next.

If this is your first time using VirtualBox (which it probably is if you need a tutorial on how to use it), then you do want to Create new hard disk and then click Next.

Click Next again.

Theoretically, a dynamically expanding virtual hard drive is best, because it’ll take up only what you actually use. I have come upon weird situations, though, when installing new software in a virtualized Ubuntu, in which the virtual hard drive just fills up instead of expanding. So I would actually recommend picking a Fixed-size storage.

Ubuntu’s default installation is less than 3 GB. If you plan on adding software or downloading large files in your virtualized Ubuntu, you should tack on some buffer.


Click Create and wait for the virtual hard drive to be created. This is actually just a very large file that lives inside of your Windows installation.

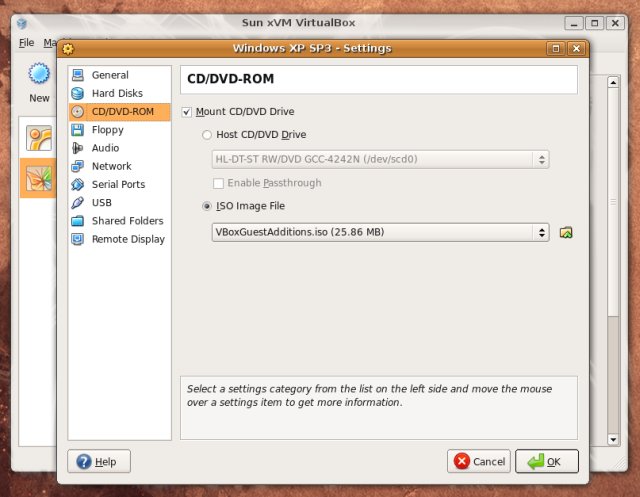
The next thing to do to make the (currently blank) virtual hard drive useful is to add the downloaded Ubuntu disk image (the .iso) boot on your virtual machine. Click on Settings and Storage. Then, under CD/DVD Device, next to Empty, you’ll see a little folder icon. Click that.

Select the Ubuntu .iso you downloaded earlier.

Once you’ve selected it, click OK.
Then double-click your virtual machine to start it up.

You may get a bunch of random warnings/instructions about how to operate the guest operating system within VirtualBox. Read those, and then you may also want to mark not to see those again.

Wait for Ubuntu to boot up.

Once it’s started up, just follow the regular installation procedure as if you were installing Ubuntu on a real hard drive (instead of a virtual one).

Afterwards, in order to use your virtualized installation (instead of continually booting the live CD), double-check that the CD/DVD Device entry is Empty again.
Advantages of virtual installation
The size of the installation doesn’t have to be predetermined. It can be a dynamically resized virtual hard drive. You do not need to reboot in order to switch between Ubuntu and Windows. The virtual machine will use your Windows internet connection, so you don’t have to worry about Ubuntu not detecting your wireless card, if you have one.
The virtual machine will set up its own video configuration, so you don’t have to worry about installing proprietary graphics drivers to get a reasonable screen resolution. You always have Windows to fall back on in case there are any problems. All you have to do is press the right Control key instead of rebooting your entire computer. For troubleshooting purposes, you can easily take screenshots of any part of Ubuntu (including the boot menu or the login screen). It’s low commitment. If you later decide you don’t like Ubuntu, all you have to do is delete the virtual hard drive and uninstall VirtualBox.
Disadvantages of virtual installation
In order to get any kind of decent performance, you need at least 512 MB of RAM, because you are running an entire operating system (Ubuntu) inside another entire operating system (Windows). The more memory, the better. I would recommend at least 1 GB of RAM.
Even though the low commitment factor can seem like an advantage at first, if you later decide you want to switch to Ubuntu and ditch Windows completely, you cannot simply delete your Windows partition. You would have to find some way to migrate out your settings from the virtual machine and then install Ubuntu over Windows outside the virtual machine. Every time you want to use Ubuntu, you have to wait for two boot times (the time it takes to boot Windows, and then the time it takes to boot Ubuntu within Windows).
Shared folders
Ubuntu inside VB and Windows work like two different computers in one physical PC. When you generate beautiful graphs and awesome tables on Ubuntu for your labmeeting, you can’t open it with MS office on Windows. Don’t send them to yourself via email. Shared Folders functionality makes multiple OS to share some space in the hard drive. You can run NGS utilities on your Ubuntu and spit out the output into the shared folder.If you’re using VirtualBox as your favorite virtualization product, you may have heard or noticed that virtual machines you install can be boosted with Guest Additions. When installed, the Guest Additions tools allow your guests to run faster and better, to share mouse and clipboard with the host, to use the Shared folders, and more.
Install Guest Additions on Windows guest
The procedure is very simple. Just boot into your guest. Then, in the VirtualBox menu, under Devices, click Install Guest Additions…

The same like VMware Tools, this will popup a wizard in your guest. Follow it through, reboot and enjoy.

After you restart, look for the VirtualBox icon in the system tray. Simple, isn’t it?
![]()
![]()
Install Guest Additions on Linux guest
Again, a fairly simple procedure. Repeat the first step. This will mount the VirtualBox Guest Additions ISO (included with the program) as a CD-ROM drive inside the virtual machine.
A file manager windows might popup, depending on your guest configuration, showing all the available options, including Guest Additions for both 32-bit and 64-bit systems, Windows and Linux alike – and even Solaris, not surprising, considering VirtualBox owned by Sun. On most modern Linux distros, the system will auto-mount CD-ROMs and launch file browsers / managers.

Choose the right package for your hardware architecture. In our case, this is x86. Open a terminal window and run the script with root privileges:
See image:

Wait a few moments until the installation is complete. Reboot.

And that’s it!
Extras (missing Guest Additions)
This extra section is necessary, because sometimes people have trouble finding the Guest Additions! In general, whenever you click Install Guest Additions …, VirtualBox is supposed to mount the Guest Additions ISO. But this may not happen. There are several ways to rectify the situation:
First, if the Guest Additions are not found, VirtualBox may prompt you to access Internet and download the ISO file. You only have to do this once. Unfortunately, I do not have a screenshots to share on this one.
Alternatively, you can download the image yourself and then manually mount it as a CD-ROM, under the Settingsfor the particular virtual machine.
Then, the next time you launch the virtual machine, the Guest Additions will be mounted as a CD-ROM. To install the Additions, on Windows, double-click the executable; on Linux, run the scripts as demonstrated above.

From here, you’re on common grounds.
The installation of VirtualBox Guest Additions is even simpler than VMware Tools. Then again, so is the installation of VirtualBox. Either way, the procedure is simple and fast and rather painless. Minimal tinkering with the command line is involved. Now, you have also learned how to master VirtualBox so that you can benefit most from your guest machines.
Guest additions
Setting up shared folders in VirtualBox is fairly straightforward. Select Shared Folders from the Devices menu.

The Shared Folders screen on the Settings dialog box displays. Use the buttons on the right side to add folders from your host machine to the Folders List. Refer to the help in VirtualBox for more information about adding shared folders.

Once you have added your shared folders in VirtualBox, you must add users in the Ubuntu 11.04 virtual machine to the vboxsf group created by VirtualBox. To do this, select Administration | Users and Groups from the System menu in the Ubuntu virtual machine.

On the Users Settings dialog box, click Manage Groups.

The Groups settings dialog box displays. Scroll down in the list of groups and select the vboxsf group. Click Properties.

On the Properties box for the vboxsf group, select the check boxes in the Group Members box for the users you want to add to the vboxsf group and click OK.

To make this change, you must provide authentication. Enter your user account password in the Password edit box and click Authenticate.

You are returned to the Groups settings dialog box. Click Close and then also click Close on the Users Settings dialog box.

Now, you should be able to access your shared folders in the /media/sf_Ubuntu_11.04 folder.
NOTE: The name of the folder inside the media folder that contains the shared folders in VirtualBox always starts with “sf_” and continues with the name of your virtual machine.

Remember to add any new users you add to your Ubuntu 11.04 virtual machine to the vboxsf group if you want them to be able to access the shared folders.
Reference:
https://www.psychocats.net/ubuntu/virtualbox
https://www.howtogeek.com/75705/access-shared-folders-in-a-virtualbox-ubuntu-11.04-virtual-machine/
https://www.dedoimedo.com/computers/virtualbox-guest-addons.html
Related posts:
![Orf]()
Difference Between CDS and ORF: A Beginner’s Guide to Bioinformatics
bioinformatics![bioinformatics-DNA, protein]()
Submitting High-Throughput Sequence Data to GEO (Gene Expression Omnibus)
bioinformatics![ChatGPT for Coders]()
Chatbots in Bioinformatics: Challenges and Opportunities
A.I![linuxbioinformatics]()
Linux cheat sheets-Bioinformatics/NGS analysis
bioinformatics![protein-structure-analysis-bioinformatics]()
Advanced Bioinformatics Techniques for Protein and Structural Biology - A Complete Guide
bioinformatics![Top 10 Python Machine Learning Tutorials to Excel in Bioinformatics]()
10 Innovative Ways Bioinformaticians are Revolutionizing Healthcare
bioinformatics![Global Genomics Initiatives]()
Drug Repurposing: A Genomic Approach
A.I![bioinformatics-FAQ]()
Frequently Searched Questions in Bioinformatics
bioinformatics![bioinformatics-statistics]()
Functional Roles of Long Non-coding RNAs (lncRNAs)
transcriptomics![AI and bioinformatics]()
Exploring the Impact of Personalized Medicine on Health Outcomes
bioinformatics![spatialtranscriptomics]()
Spatial Omics: Revolutionizing Tissue-Level Molecular Insights
proteomics![moleculargenetics]()
Tackling Bias in Gene Expression Dataset Selection
A.I![bioinformatics]()
The Definitive Guide to Bioinformatics Tools, Software, and Databases
bioinformatics![Small Nucleolar RNAs (snoRNAs)]()
Small Nucleolar RNAs (snoRNAs) in RNA Modifications
transcriptomics![Best bioinformatics software 2023]()
Comprehensive 2023 Buyer's Guide: 30+ Best Bioinformatics Software and Tools for Reliable Data Analy...
bioinformatics![Bioinformatics Cheatsheet]()
Bioinformatics Cheat Sheet: A Step-by-Step Guide for Beginners
bioinformatics