Data Submission in Bioinformatics Databases: Sequences and Structures
March 10, 2024Course Description: This course provides an in-depth exploration of the principles and practices involved in submitting sequence and structural data to bioinformatics databases. Students will learn about the importance of data submission, the types of data accepted by different databases, and the tools and software used for data submission. Practical exercises will focus on preparing and formatting data for submission, navigating submission interfaces, and understanding the data curation process.
Course Objectives:
- Understand the significance of data submission in bioinformatics databases.
- Learn about the different types of sequence and structural data accepted by bioinformatics databases.
- Gain proficiency in using tools and software for preparing and submitting data to bioinformatics databases.
- Develop skills in formatting data according to database requirements.
- Learn about the data curation process and its importance in maintaining database integrity.
Introduction to Data Submission
Importance of data submission in bioinformatics databases
Data submission to bioinformatics databases is crucial for several reasons:
- Data Availability: Submitting data to bioinformatics databases makes it available to the scientific community for analysis, interpretation, and reuse, enhancing the overall knowledge base in the field.
- Data Sharing: Sharing data promotes collaboration among researchers and institutions, leading to more comprehensive analyses and discoveries.
- Data Integrity: By submitting data to reputable databases, researchers ensure the integrity and long-term preservation of their data, preventing loss and maintaining data quality.
- Standardization: Databases often have specific formats and standards for data submission, promoting consistency and interoperability among different datasets.
- Citation and Credit: Submitting data to databases allows researchers to receive proper citation and credit for their work, enhancing the visibility and impact of their research.
- Ethical Considerations: Data submission to databases ensures that research data is managed and used responsibly, following ethical guidelines and regulations.
- Data Analysis and Interpretation: Access to large, curated datasets in databases enables researchers to perform more comprehensive analyses and gain deeper insights into biological systems.
Overall, data submission to bioinformatics databases is essential for advancing scientific knowledge, promoting collaboration, and ensuring the integrity and accessibility of research data.
Overview of the types of data accepted by bioinformatics databases
Bioinformatics databases accept various types of data, including but not limited to:
- Sequence Data: This includes nucleotide sequences (DNA, RNA) and amino acid sequences (proteins). Databases like GenBank, EMBL-EBI, and DDBJ are known for storing sequence data.
- Structural Data: Databases such as the Protein Data Bank (PDB) store three-dimensional structures of biological macromolecules, including proteins and nucleic acids.
- Functional Data: This includes functional annotations of genes and proteins, such as Gene Ontology (GO) terms, enzyme classifications (EC numbers), and protein domains. Databases like UniProt and InterPro provide functional annotations.
- Expression Data: Databases like GEO (Gene Expression Omnibus) and ArrayExpress store gene expression data from microarray and RNA-seq experiments.
- Pathway Data: Databases such as KEGG and Reactome store information about biological pathways, including the genes, proteins, and small molecules involved.
- Genomic Variation Data: Databases like dbSNP and COSMIC store information about genetic variations, such as single nucleotide polymorphisms (SNPs) and somatic mutations.
- Metagenomic Data: Databases like MG-RAST and IMG/M store metagenomic sequences and metadata from environmental samples.
- Clinical Data: Some databases, such as ClinVar and TCGA, store clinical and genomic data from patients, including information about diseases and treatments.
These are just a few examples, and the types of data accepted by bioinformatics databases can vary widely depending on their focus and purpose.
Types of Data Accepted
Sequence data: nucleotide and protein sequences
Sequence data is a fundamental type of data in bioinformatics, encompassing nucleotide and protein sequences.
- Nucleotide Sequences: These sequences represent the order of nucleotide bases (adenine, thymine, cytosine, and guanine) in DNA or RNA molecules. Nucleotide sequences are crucial for studying genetic information, gene expression, and evolutionary relationships.
- Protein Sequences: These sequences represent the order of amino acids in a protein. Protein sequences are essential for understanding protein structure, function, and interactions in biological systems.
Bioinformatics databases store and manage vast amounts of nucleotide and protein sequence data, providing researchers with access to sequences from various organisms and sources. These databases facilitate sequence analysis, comparison, and annotation, supporting research in genetics, molecular biology, and evolutionary biology. Examples of databases that store nucleotide and protein sequences include GenBank, EMBL-EBI, UniProt, and NCBI Protein.
Structural data: protein structures, macromolecular complexes
Structural data in bioinformatics refers to information about the three-dimensional (3D) structures of biological molecules, particularly proteins and macromolecular complexes. This type of data is crucial for understanding the molecular mechanisms underlying biological processes and for drug discovery and design. Here’s an overview of protein structures and macromolecular complexes:
- Protein Structures: Protein structures describe the spatial arrangement of atoms in a protein molecule. The primary structure of a protein is its amino acid sequence, while the secondary structure refers to local folding patterns such as alpha helices and beta sheets. The tertiary structure is the overall 3D conformation of the protein, and the quaternary structure refers to the arrangement of multiple protein subunits in a complex. Experimental methods like X-ray crystallography, nuclear magnetic resonance (NMR) spectroscopy, and cryo-electron microscopy (cryo-EM) are used to determine protein structures.
- Macromolecular Complexes: These complexes are formed by the interaction of multiple biomolecules, such as proteins, nucleic acids, and small molecules. Examples include ribosomes, which are complexes of RNA and proteins involved in protein synthesis, and DNA replication complexes. Understanding the structures of these complexes is essential for elucidating their functions in biological processes.
Databases like the Protein Data Bank (PDB) store experimentally determined 3D structures of proteins and macromolecular complexes. These databases are valuable resources for researchers studying protein structure-function relationships, protein-protein interactions, and drug targeting.
Preparing Data for Submission
Formatting data according to database requirements is crucial for successful data submission and integration into bioinformatics databases. Each database may have specific formats, standards, and guidelines for data submission, which can vary depending on the type of data being submitted. Here are some general steps for formatting data:
- Understand Database Requirements: Before formatting your data, carefully read the database’s submission guidelines and documentation to understand the required formats, file types, and metadata.
- Prepare Data: Organize your data into the required format. This may include formatting sequences, structures, annotations, and other relevant information according to the database’s specifications.
- Use Standard File Formats: Use standard file formats such as FASTA for sequence data, PDB for structural data, and XML or JSON for metadata. Convert your data into these formats if necessary.
- Include Metadata: Provide relevant metadata such as descriptions, identifiers, experimental details, and references along with your data. Ensure that the metadata format complies with the database requirements.
- Validate Data: Use validation tools provided by the database or third-party tools to ensure that your data meets the required standards and formats. Correct any errors or inconsistencies.
- Submit Data: Follow the database’s submission process to upload your formatted data. Provide any additional information or documentation required during the submission process.
- Review Submission: After submission, review the data entry in the database to ensure that it has been processed correctly and is accessible to users.
By formatting your data according to database requirements, you can ensure that your data is properly integrated, curated, and accessible for use by the scientific community
Quality control checks for data integrity
Quality control (QC) checks are essential for ensuring the integrity and reliability of data in bioinformatics. Here are some common QC checks for different types of data:
- Sequence Data:
- Sequence Quality Scores: Check the quality scores associated with each base in sequencing data to ensure accuracy.
- Sequence Length: Verify that the sequence length matches the expected length for the type of data (e.g., reads, contigs, chromosomes).
- Sequence Complexity: Assess the complexity of the sequence to detect any anomalies or contamination.
- Structural Data:
- Resolution and R-Value: For X-ray crystallography structures, check the resolution and R-value to assess the quality of the structure.
- Geometry: Evaluate the bond lengths, angles, and torsion angles to ensure they fall within acceptable ranges.
- Ramachandran Plot: Examine the Ramachandran plot to assess the quality of the protein backbone conformation.
- Expression Data:
- Normalization: Check the normalization of expression data to ensure comparability between samples.
- Outlier Detection: Identify and remove outliers that may skew the results of expression analysis.
- Batch Effects: Detect and correct for batch effects that may arise from differences in experimental conditions.
- Genomic Variation Data:
- Variant Calling Metrics: Assess variant calling metrics such as depth of coverage, allele frequency, and genotype quality.
- Annotation: Verify the annotation of genetic variants to ensure accuracy and consistency.
- Metagenomic Data:
- Taxonomic Profiling: Check the taxonomic profiles of metagenomic samples to assess the composition of microbial communities.
- Functional Annotation: Verify the functional annotation of metagenomic sequences to identify potential functional pathways.
- Clinical Data:
- Data Consistency: Ensure consistency and accuracy of clinical data entries, including patient demographics, diagnoses, and treatments.
- Privacy and Security: Implement measures to protect patient privacy and comply with relevant regulations (e.g., HIPAA).
These QC checks help ensure that the data used in bioinformatics analyses are reliable, accurate, and suitable for downstream analysis and interpretation.
Tools and Software for Data Submission
Introduction to submission interfaces
Submission interfaces are tools provided by bioinformatics databases to allow researchers to submit their data to the database. These interfaces are designed to streamline the submission process and ensure that the submitted data meet the database’s requirements. Here is an introduction to submission interfaces:
- Purpose: Submission interfaces serve as the primary means for researchers to upload their data, metadata, and any related information to a bioinformatics database. This can include sequences, structures, experimental data, annotations, and other types of biological data.
- User-Friendly Design: Submission interfaces are typically designed to be user-friendly, with clear instructions and prompts to guide researchers through the submission process. They often include forms for entering metadata and uploading files, as well as validation checks to ensure that the submitted data meet the database’s formatting requirements.
- Metadata Entry: Researchers are usually required to provide metadata along with their data submissions. Metadata can include information such as the experimental methods used, sample descriptions, data sources, and any relevant publications. Submission interfaces often include specific fields for entering metadata, and researchers may be prompted to provide additional details as needed.
- File Upload: Submission interfaces allow researchers to upload files containing their data. This can include sequences in FASTA format, structures in PDB format, and other types of data files. Interfaces may also include features for uploading multiple files, organizing files into groups, and specifying file formats.
- Validation and Feedback: Submission interfaces often include validation checks to ensure that the submitted data meet the database’s requirements. Researchers may receive immediate feedback on their submissions, highlighting any errors or issues that need to be addressed before the data can be accepted.
- Submission Tracking: Some submission interfaces include features for tracking the status of submissions. Researchers may be able to monitor the progress of their submissions, receive notifications when their submissions are processed, and access information about how their data are being used.
Overall, submission interfaces play a crucial role in facilitating the submission of data to bioinformatics databases, helping to ensure that the data are properly formatted, documented, and accessible for use by the scientific community.
Overview of commonly used tools for data preparation and submission
There are several commonly used tools for data preparation and submission to bioinformatics databases. These tools help researchers format their data according to database requirements and streamline the submission process. Here is an overview of some of these tools:
- Bioconductor: Bioconductor is an open-source software project based on R programming language that provides tools for the analysis and comprehension of high-throughput genomic data. It includes packages for data formatting and submission to various bioinformatics databases.
- Galaxy: Galaxy is an open-source platform for data-intensive biomedical research that provides a web-based interface for data analysis and workflow management. It includes tools for formatting and preparing data for submission to bioinformatics databases.
- EMBOSS: The European Molecular Biology Open Software Suite (EMBOSS) is a collection of open-source software tools for molecular biology. It includes tools for sequence analysis, alignment, and formatting data for submission to databases like GenBank and EMBL-EBI.
- Biopython: Biopython is a collection of Python tools for computational biology. It includes modules for working with biological sequences, structures, and annotations, as well as tools for formatting data for submission to bioinformatics databases.
- BioJava: BioJava is a library for working with biological data in Java. It includes modules for sequence analysis, structure prediction, and formatting data for submission to bioinformatics databases.
- BLAST: The Basic Local Alignment Search Tool (BLAST) is a widely used tool for comparing biological sequences. It includes options for formatting data for submission to databases like GenBank and EMBL-EBI.
- EMBL-EBI Submission Tools: The European Bioinformatics Institute (EMBL-EBI) provides submission tools for formatting and submitting various types of data, including sequences, structures, and functional annotations, to its databases.
These tools provide researchers with the necessary functionalities to format their data according to database requirements and facilitate the submission process to bioinformatics databases.
Submitting Sequence Data
Step-by-step guide to submitting nucleotide and protein sequences
Here is a step-by-step guide to submitting nucleotide and protein sequences to a bioinformatics database such as GenBank, EMBL-EBI, or DDBJ:
- Prepare Your Data: Organize your nucleotide or protein sequences into a file. For nucleotide sequences, use the FASTA format, which starts with a header line beginning with “>” followed by the sequence. For protein sequences, use the same format but specify that it is a protein sequence (e.g., “>protein_sequence”).
- Check Database Requirements: Visit the submission guidelines page of the database you intend to submit to and review their requirements for sequence submissions. Note any specific formatting guidelines or metadata requirements.
- Access Submission Interface: Go to the database’s submission portal or interface. You may need to create an account if you haven’t already.
- Enter Metadata: Fill in the metadata fields provided, including information such as the organism name, sequence description, and any relevant publication information. Follow the database’s guidelines for metadata entry.
- Upload Your Sequences: Use the file upload feature to select and upload your nucleotide or protein sequence file. Some databases may allow you to paste sequences directly into a text box instead.
- Verify and Submit: Review the information you have entered, including the sequences and metadata. Make any necessary corrections or additions. Once you are satisfied, submit your data.
- Receive Confirmation: After submission, you should receive a confirmation email or notification from the database indicating that your submission has been received. The database will then process your submission and make it available to the public after validation.
- Accession Number: Once your submission is processed and validated, you will be assigned an accession number for your sequence. This number serves as a unique identifier for your data and can be used to reference it in publications and analyses.
- Check Data Entry: Periodically check the database to ensure that your data entry is accurate and up-to-date. You may need to update your entry with new information or corrections as needed.
Following these steps will help you successfully submit your nucleotide and protein sequences to a bioinformatics database, making them accessible to the scientific community for further analysis and research.
Understanding sequence feature annotations
Sequence feature annotations provide important information about specific regions or features within a nucleotide or protein sequence. These annotations describe various aspects of the sequence, such as gene locations, protein domains, binding sites, and post-translational modifications. Here are some common types of sequence feature annotations:
- Gene Features: Annotations related to genes include information about coding regions (CDS), untranslated regions (UTRs), start and stop codons, and introns/exons.
- Protein Features: Annotations related to proteins include protein domains, motifs, signal peptides, transmembrane regions, and post-translational modifications such as phosphorylation and glycosylation sites.
- Functional Annotations: Annotations related to function include Gene Ontology (GO) terms, which describe the molecular function, biological process, and cellular component of a gene or protein.
- Variation Annotations: Annotations related to genetic variations include single nucleotide polymorphisms (SNPs), insertions, deletions, and structural variants.
- Regulatory Features: Annotations related to regulatory elements include promoters, enhancers, and transcription factor binding sites.
- Sequence Repeats: Annotations of repetitive sequences or tandem repeats within the sequence.
- Miscellaneous Features: Annotations of other features such as non-coding RNAs (ncRNAs), ribosomal binding sites, and mobile genetic elements.
These annotations are typically represented in a standardized format, such as the Feature Table format used in GenBank files, which includes information about the feature type, location (start and end positions), and any additional qualifiers or descriptors. Understanding sequence feature annotations is crucial for interpreting and analyzing biological sequences, as they provide insights into the structure, function, and regulation of genes and proteins.
Submitting Structural Data
Step-by-step guide to submitting protein structures and macromolecular complexes
Here is a step-by-step guide to submitting protein structures and macromolecular complexes to a bioinformatics database such as the Protein Data Bank (PDB):
- Prepare Your Data: Organize your protein structure or macromolecular complex data into a file. For protein structures, use the PDB format, which includes information about the atomic coordinates of the atoms in the protein. For macromolecular complexes, ensure that the file includes the coordinates of all the molecules in the complex.
- Check Database Requirements: Visit the submission guidelines page of the PDB or the database you intend to submit to and review their requirements for structure submissions. Note any specific formatting guidelines or metadata requirements.
- Access Submission Interface: Go to the database’s submission portal or interface. You may need to create an account if you haven’t already.
- Enter Metadata: Fill in the metadata fields provided, including information such as the structure description, experimental method used (e.g., X-ray crystallography, NMR spectroscopy), and any relevant publication information. Follow the database’s guidelines for metadata entry.
- Upload Your Structure File: Use the file upload feature to select and upload your protein structure or macromolecular complex file. The database may also require you to submit additional files, such as structure validation reports or experimental data files.
- Verify and Submit: Review the information you have entered, including the structure file and metadata. Make any necessary corrections or additions. Once you are satisfied, submit your data.
- Receive Confirmation: After submission, you should receive a confirmation email or notification from the database indicating that your submission has been received. The database will then process your submission and make it available to the public after validation.
- Accession Number: Once your submission is processed and validated, you will be assigned an accession number for your structure. This number serves as a unique identifier for your data and can be used to reference it in publications and analyses.
- Check Data Entry: Periodically check the database to ensure that your data entry is accurate and up-to-date. You may need to update your entry with new information or corrections as needed.
Following these steps will help you successfully submit your protein structures and macromolecular complexes to a bioinformatics database, making them accessible to the scientific community for further analysis and research.
Understanding structure validation and quality assessment
Structure validation and quality assessment are crucial steps in ensuring the accuracy and reliability of protein structures and macromolecular complexes determined through experimental methods such as X-ray crystallography, NMR spectroscopy, or cryo-electron microscopy. Here’s an overview of these concepts:
- Structure Validation: Structure validation involves assessing the overall quality and correctness of a protein structure or macromolecular complex. This process typically includes several steps:
- Geometry Checks: Verify the geometry of the structure, including bond lengths, bond angles, and torsion angles, to ensure they fall within acceptable ranges.
- Ramachandran Plot Analysis: Examine the Ramachandran plot, which shows the distribution of phi and psi angles for residues in the protein structure, to identify outliers that indicate incorrect or unusual backbone conformations.
- MolProbity Analysis: Use tools such as MolProbity to assess the overall quality of the structure, including clash scores (indicating steric clashes), rotamer outliers (unusual side-chain conformations), and other quality metrics.
- Quality Assessment:
- Resolution (for X-ray Crystallography): For X-ray crystallography structures, resolution indicates the level of detail in the structure and is an important quality metric. Lower resolution values indicate higher quality structures.
- R-Value and R-Free (for X-ray Crystallography): These values indicate the agreement between the observed data and the model. Lower R-values and reasonable R-free values indicate a better fit between the model and the data.
- Quality Scores: Various quality assessment scores, such as the Global Distance Test (GDT), Local Distance Test (LDT), and other structure comparison metrics, can be used to assess the quality of a structure relative to other structures in the database.
- Validation Tools: There are several software tools and web servers available for structure validation and quality assessment, including PROCHECK, WHAT_CHECK, MolProbity, and PDB Validation Server. These tools help researchers identify and correct potential issues in their protein structures or macromolecular complexes.
By performing thorough structure validation and quality assessment, researchers can ensure that their protein structures and macromolecular complexes are accurate, reliable, and suitable for use in further analyses and research.
Data Curation and Database Integrity
Importance of data curation in maintaining database quality
Data curation plays a crucial role in maintaining the quality, integrity, and usability of bioinformatics databases. Here are some key reasons why data curation is important:
- Data Accuracy: Curation ensures that data are accurate, reliable, and free from errors. Curators review and validate data to correct mistakes and inconsistencies, improving the overall quality of the database.
- Data Completeness: Curators work to ensure that databases contain comprehensive and complete datasets. They may add missing data, fill in gaps, and integrate data from multiple sources to provide a more complete picture.
- Data Standardization: Curation involves standardizing data formats, annotations, and metadata. Standardization makes it easier for researchers to access, understand, and compare data across different datasets and databases.
- Data Integration: Curators integrate data from various sources to create unified datasets. This integration enables researchers to perform more comprehensive analyses and make new discoveries by combining different types of data.
- Data Consistency: Curators ensure that data are consistent and adhere to predefined standards and guidelines. Consistent data facilitate accurate analyses and interpretations.
- Data Accessibility: Curated databases are more accessible to researchers, as they provide well-organized and easily searchable datasets. This accessibility promotes data reuse and collaboration within the scientific community.
- Data Quality Control: Curation involves quality control checks to identify and correct errors, inconsistencies, and anomalies in the data. This ensures that the database contains high-quality, reliable data.
- Data Privacy and Security: Curators work to protect sensitive data and ensure compliance with privacy regulations. They implement security measures to prevent unauthorized access and data breaches.
Overall, data curation is essential for maintaining the quality, integrity, and usability of bioinformatics databases. It ensures that databases contain accurate, comprehensive, and standardized data that are accessible and usable for researchers in the scientific community.
Understanding the curation process and its impact on data usability
The curation process involves a series of steps to ensure that data in bioinformatics databases are accurate, reliable, and usable. The process typically includes the following key steps:
- Data Collection: Curators collect data from various sources, including experimental studies, literature, and other databases. They ensure that the data are relevant to the database’s scope and objectives.
- Data Validation: Curators validate the collected data to ensure its accuracy and reliability. This may involve comparing the data against established standards, checking for errors and inconsistencies, and verifying the data’s integrity.
- Data Standardization: Curators standardize the format, annotations, and metadata of the data to ensure consistency and compatibility with other datasets. This allows researchers to easily integrate and compare data from different sources.
- Data Integration: Curators integrate data from various sources to create unified datasets. This integration enables researchers to perform more comprehensive analyses and make new discoveries by combining different types of data.
- Data Annotation: Curators annotate the data with relevant information, such as gene names, protein functions, and biological pathways. This annotation provides context to the data and enhances its usability for researchers.
- Data Quality Control: Curators perform quality control checks to identify and correct errors, inconsistencies, and anomalies in the data. This ensures that the database contains high-quality, reliable data.
- Data Accessibility: Curators ensure that the curated data are easily accessible to researchers. They develop user-friendly interfaces, provide search and retrieval tools, and establish data sharing policies to promote data usability.
The impact of the curation process on data usability is significant. Curation enhances the quality, reliability, and completeness of the data, making it more valuable and usable for researchers. Curated data are easier to search, retrieve, and analyze, facilitating research and discovery in bioinformatics and related fields. Overall, the curation process plays a crucial role in ensuring that bioinformatics databases contain high-quality, reliable, and usable data for the scientific community.
Case Studies
- Case Study 1: Genomic Variation Data Submission
- Data Submission: A research group conducted a genome-wide association study (GWAS) to identify genetic variants associated with a specific disease phenotype. They prepared a dataset containing genotype information for thousands of individuals and submitted it to a public database such as dbGaP (Database of Genotypes and Phenotypes) or the European Variation Archive (EVA).
- Challenges: Challenges in this scenario may include ensuring data privacy and confidentiality, especially if the dataset contains sensitive information about study participants. Additionally, formatting the data according to the database’s requirements and dealing with large datasets can be challenging.
- Solutions: The researchers implemented data anonymization techniques to protect participants’ privacy, such as removing personally identifiable information and aggregating data. They also used data processing tools and scripts to format the data correctly and ensure compliance with database requirements.
- Case Study 2: Protein Structure Submission
- Data Submission: A structural biology lab determined the crystal structure of a novel protein using X-ray crystallography. They prepared the structure file in the PDB format and submitted it to the Protein Data Bank (PDB).
- Challenges: Challenges in this case may include ensuring the quality and integrity of the structure, dealing with structural ambiguities or missing data, and complying with the PDB’s formatting and annotation requirements.
- Solutions: The researchers performed thorough structure validation using tools like MolProbity and PROCHECK to identify and correct any structural irregularities. They also carefully annotated the structure file with relevant metadata, such as experimental details and functional annotations, to enhance its usability for other researchers.
- Case Study 3: Gene Expression Data Submission
- Data Submission: A research team conducted a transcriptomics study to investigate gene expression patterns in response to a specific treatment. They generated RNA-seq data from different experimental conditions and submitted it to a public repository such as GEO (Gene Expression Omnibus) or ArrayExpress.
- Challenges: Challenges in this scenario may include handling large and complex datasets, ensuring data consistency and normalization, and providing comprehensive metadata to facilitate data interpretation.
- Solutions: The researchers used bioinformatics tools and pipelines to process and analyze the RNA-seq data, including steps for quality control, normalization, and differential expression analysis. They also carefully curated metadata describing the experimental conditions, sample characteristics, and data processing methods to provide context for the submitted data.
In each of these case studies, successful data submission required careful attention to data quality, privacy, formatting, and annotation, as well as the use of appropriate tools and methodologies to address specific challenges.
Future Directions in Data Submission
Emerging Trends in Data Submission and Database Management:
- FAIR Principles: There is a growing emphasis on making data Findable, Accessible, Interoperable, and Reusable (FAIR). This involves ensuring that data are well-organized, properly annotated, and accessible to both humans and machines, enabling broader data sharing and reuse.
- Integration of Multi-Omics Data: With advancements in high-throughput technologies, there is a trend towards integrating data from multiple omics layers (genomics, transcriptomics, proteomics, etc.) to gain deeper insights into biological systems. Databases are evolving to accommodate and facilitate the integration of these diverse datasets.
- Cloud-Based Solutions: The use of cloud computing for data storage and analysis is becoming increasingly popular due to its scalability, flexibility, and cost-effectiveness. Databases are moving towards cloud-based solutions to handle large volumes of data and complex analyses.
- Data Versioning and Provenance: There is a growing focus on tracking the versioning and provenance of data, ensuring that users can trace the history of data changes and understand how data were generated and processed.
- Machine Learning and AI: Machine learning and artificial intelligence are being used to enhance data curation, quality control, and analysis in bioinformatics databases. These technologies can help automate repetitive tasks, improve data accuracy, and extract meaningful insights from large datasets.
Ethical Considerations in Data Submission and Sharing:
- Data Privacy and Security: Ensuring the privacy and security of data is paramount. Researchers must anonymize data, obtain informed consent from participants, and comply with data protection regulations such as GDPR and HIPAA.
- Data Ownership and Attribution: Clarifying data ownership and providing proper attribution to data contributors is essential. Researchers should adhere to guidelines for data citation and acknowledge the contributions of data generators and curators.
- Inclusivity and Equity: Ensuring that data sharing practices are inclusive and equitable is important. Efforts should be made to address issues of data bias and ensure that underrepresented groups are included in data collection and sharing initiatives.
- Transparency and Openness: Promoting transparency and openness in data sharing practices helps build trust and credibility. Researchers should be transparent about data sources, methodologies, and any potential conflicts of interest.
- Community Engagement: Engaging with the broader scientific community and stakeholders is key to ensuring that data sharing practices are aligned with community values and expectations. Collaboration and communication are essential for building consensus and addressing ethical concerns.
Practical Exercises
Interactive Submission
Introduction
This guide will introduce you to the Webin Portal service, which allows you to submit data to ENA interactively through an ordinary web browser.
Production and Test Services
There are two Webin Portal services: one for test submissions and another for production (real) submissions. The test service allows you to trial the interface in a consequence-free manner. The test service is recreated from the full content of the production service every day at 03.00 GMT/BST. Therefore, any submissions made to the test service will be removed by the following day.
- Test service URL: https://wwwdev.ebi.ac.uk/ena/submit/webin/login
- Production service URL: https://www.ebi.ac.uk/ena/submit/webin/login
We advise and encourage that you trial your submissions using the Webin test service before using the production service.
What Can Be Submitted Through Webin Portal?
Some submissions can be done entirely through Webin Portal, for example you could submit a study comprising only read data without needing to use any of the other submission interfaces. However Some types of submission cannot be completed via Webin Portal and must be done through our other submission routes. Usually, this is because some submission types are limited to our Webin-CLI tool, which has extensive pre-submission data validation capability built in and is able to flag up errors in your data before you submit it. Because of this, Webin-CLI is recommended for all circumstances in which it is an option.
For a summary of what can be submitted through each interface, as well as what these interfaces are, please refer to the table in the General Guide on ENA Data Submission.
Submission
When you come to make a new submission, you will have the options described below. Follow the links for specific guidance on each submission activity.
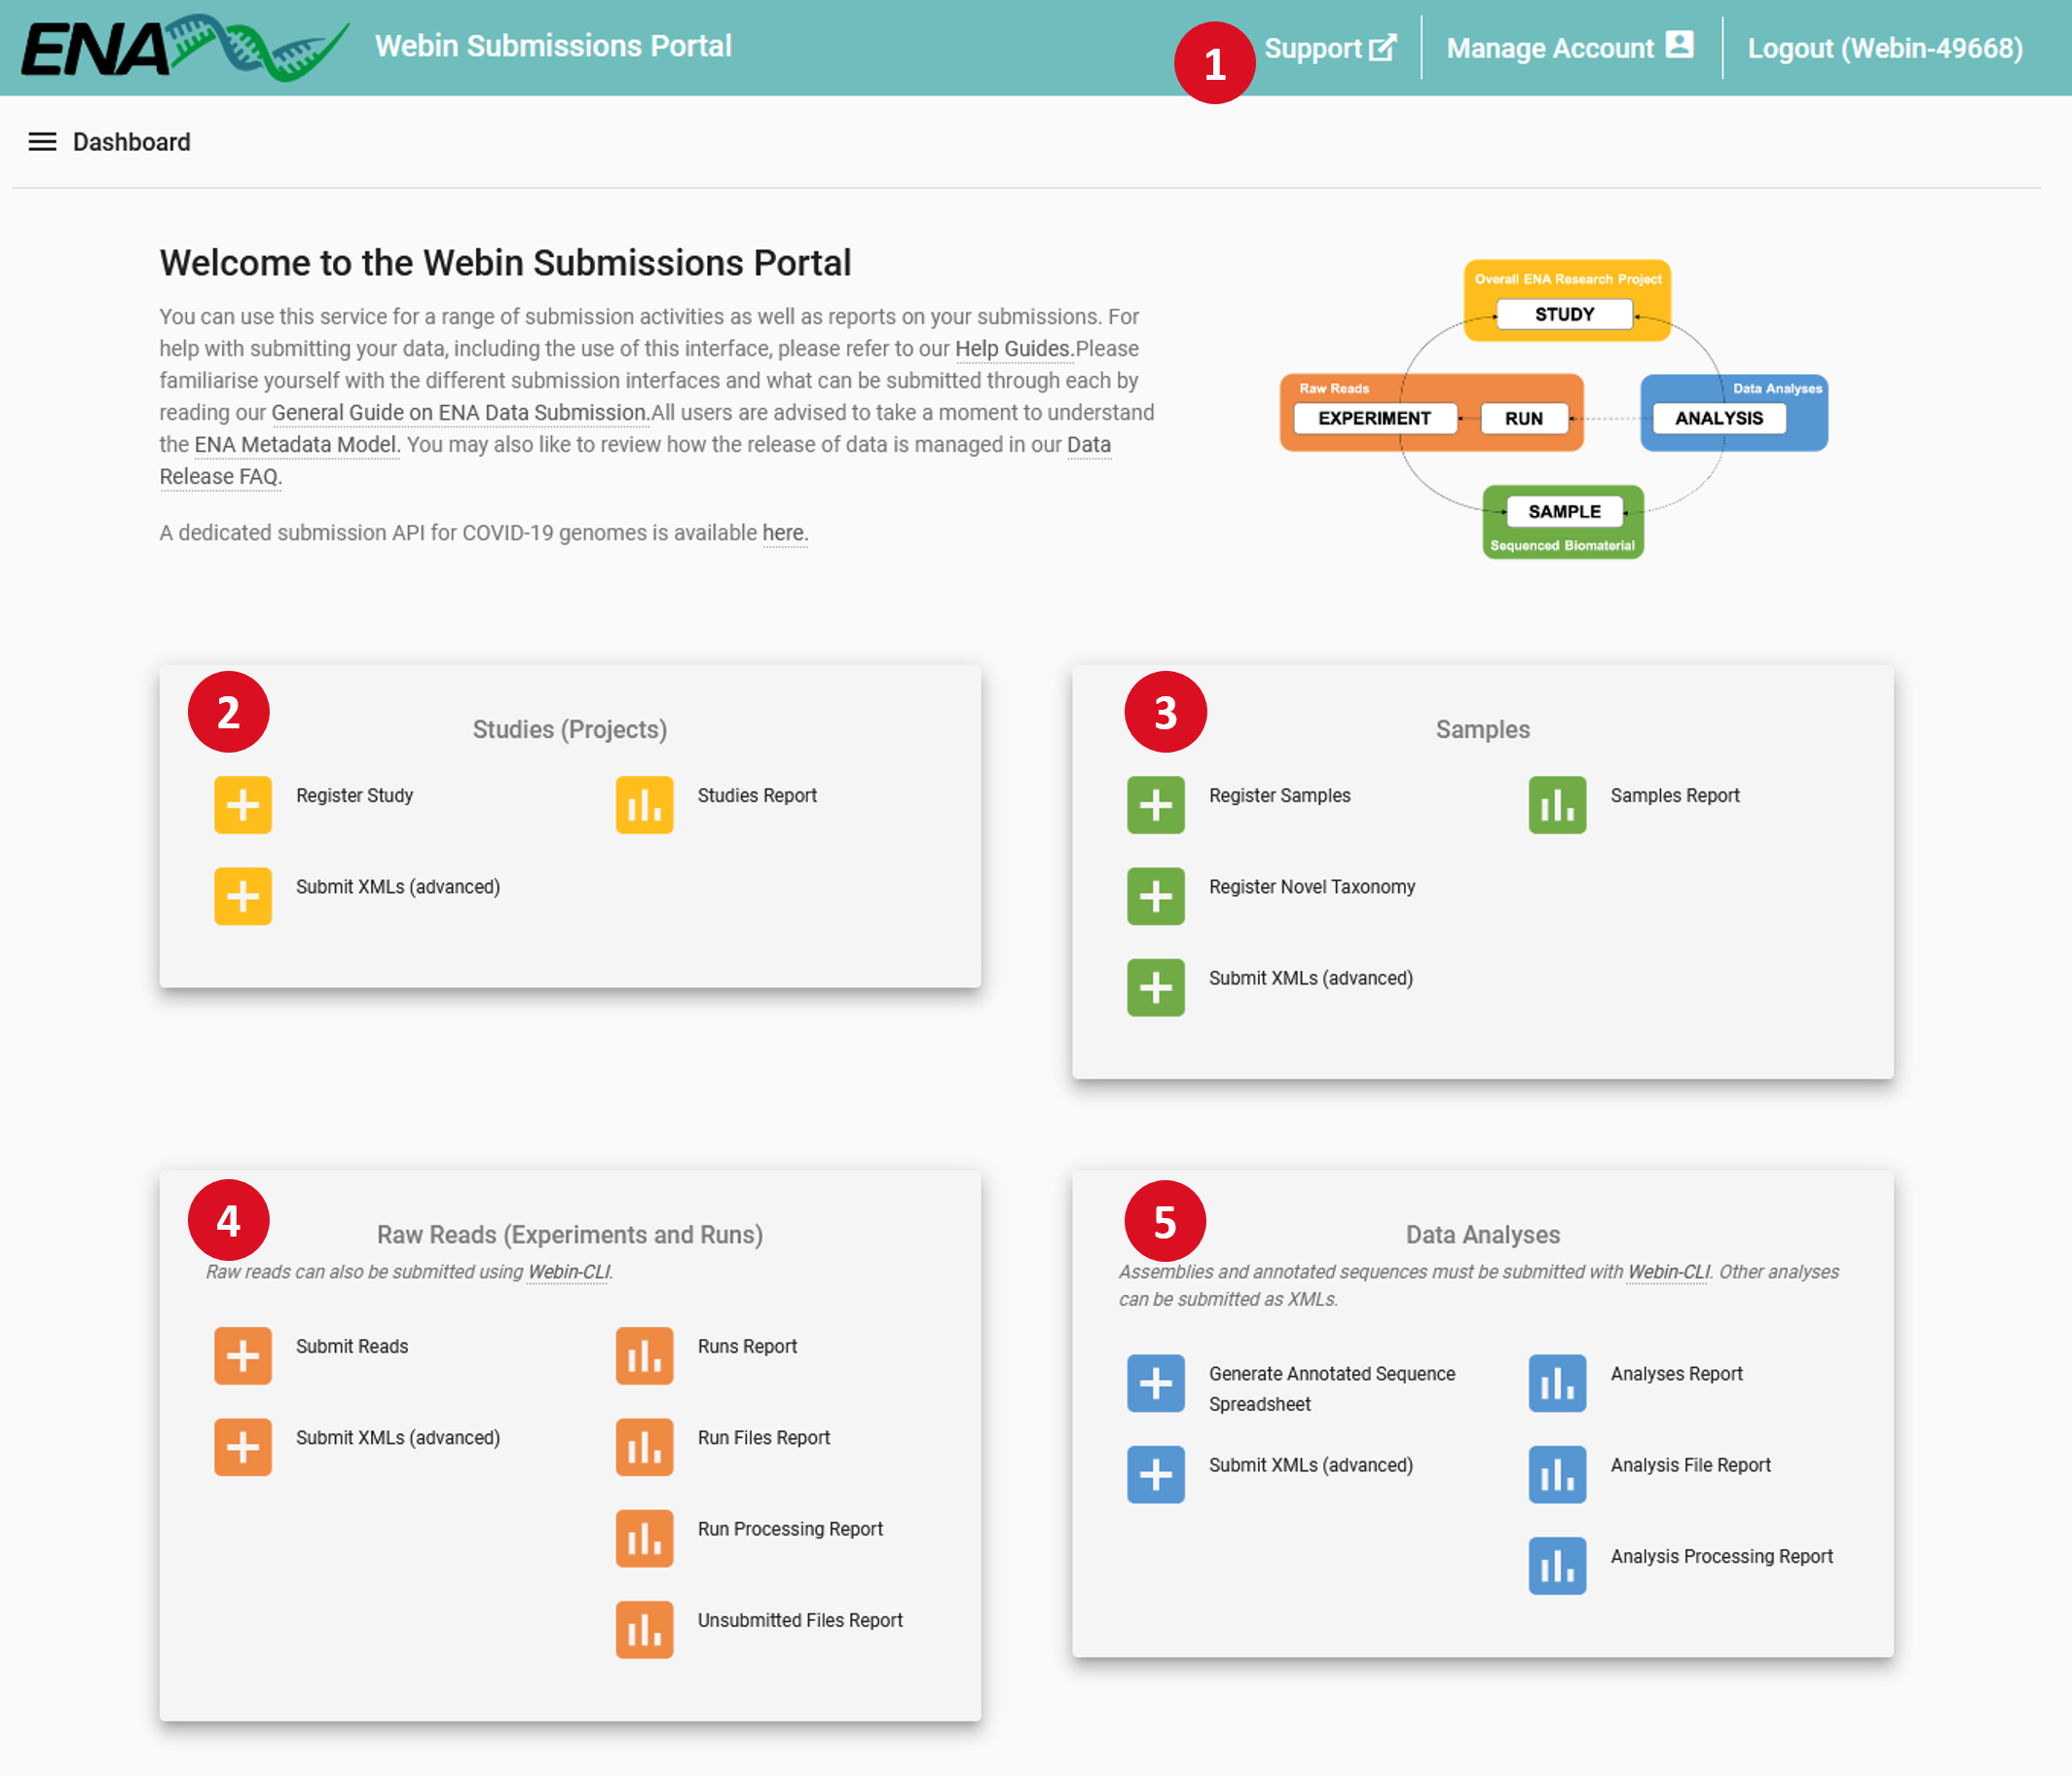
- 1 – Header Bar:
- Support: Links to the ENA support form, where you can request assistance from our helpdesk
Manage Account: Update the information associated with your account, add contact information for people using the account, and change your centre name, a value which is immutably attached to all your submissions
- 2 – Studies (Projects):
- Register Study: An interface to register new studies
Submit XMLs: You can submit studies in XML format through this interface
Studies Report: Review and edit previously submitted studies, and change their release date
- 3 – Samples:
- Register samples: Select and customise a sample checklist, download a template spreadsheet, then re-upload it to this interface to register your samples
Register taxonomy: If your submission uses taxa which are not known to the taxonomy database, you can request their addition through this interface
Submit XMLs: You can submit samples in XML format through this interface
Samples Report: Review and edit previously submitted samples
- 4 – Raw Reads (Experiments and Runs):
- Submit reads: Select a type of read data and download a template spreadsheet, then re-upload it to this interface to complete registration of your read data
Submit XMLs: You can submit experiments and runs in XML format through this interface
Runs Report: Review and edit previously submitted runs and experiments
Run Files Report: Review status of files associated with previously submitted runs
Run Processing Report: Review processing status of files associated with previously submitted runs
Unsubmitted Files Report: Before you can submit a run file here you must upload it to your account’s FTP area; review the status of such unsubmitted files here
- 5 – Data Analyses:
- Create annotated sequence spreadsheet: Short pieces of assembled and annotated sequence such as single genes and others can often be submitted using template spreadsheets; select and customise a template here and download a file to submit via Webin-CLI
Submit XMLs: You can submit some analysis types in XML format through this interface
Analyses Report: Review and edit previously submitted analyses
Analysis File Report: Review status of files associated with previously submitted analyses
Analysis Processing Report: Review processing status of files associated with previously submitted analyses
Each of these links will interfaces which provide further information on how to complete the described action. Interactive submission is recommended for registration of your Study and Samples and for small scale Read submissions.
Guide to ENA submission (webin)
This is a guide on how to submit sequence reads from environmental samples to the European Nucleotide Archive (ENA), provided by the Swedish Biodiversity Data Infrastructure (SBDI). Our guide is largely a summary of ENA’s own extensive instructions, with added pointers on issues specific to submission of metarbarcoding data, as well as on more general matters that may confuse first-time contributors. While ENA provides three different routes for submission, we describe interactive submission via the Webin portal here.
Preparation for submission
Step 1: Prepare data and metadata
In ENA, raw sequencing output from a next generation platform, including e.g. base calls and per-base quality scores, is accepted in FASTQ, CRAM or BAM format. Before submission, make sure that sequencing adapters have been removed (trimmed), and that reads have been assigned to their sample of origin (demultiplexed). In addition, gather all the information (metadata) you have about how, when and where you acquired the samples and generated the reads, as well as any contextual (environmental or clinical) data that was collected during sampling (see ENA’s metadata model).
Step 2: Register with ENA
To be able to submit data to ENA, you need to register an account. Go to the Webin submission Portal, select Register to fill out the form, and save your account details. You will receive a confirmation email with your account name.
Interactive submission
Step 1: Log in to submission portal
ENA provides two submission services: one for test submission and one for (real) production submission. Make sure that your data pass validation in the test procedure, before submitting anything to the production environment. All test submissions are removed the following day, but you will save all metadata as tab-separated text (*.tsv) files that you can reuse later.
After login, you are directed to the Dashboard, which gives you an overview of all available submission activities and reports (i.e. lists of successfully submitted samples etc.). Via the top-left hamburger icon (![]()
![]() ) you can either go back to this Dashboard, or jump directly to some activity or report.
) you can either go back to this Dashboard, or jump directly to some activity or report.
Step 2: Register study
The study (project) object is linked to samples and sequence reads via experiments, and is typically what you cite in publications. Click Studies (Projects) | Register Study to start filling out the Study form. Note that a single release date is set for all data within a study, and that you thus may want to split sequenced batches of samples into multiple ENA studies. After entering the required metadata for a study, click Submit | OK. If successful, you will receive a confirmation message, and should be able to see your study listed in the Studies (Projects) | Study Report page.
Step 3: Register samples
Samples are the source material from which your sequences derive, and the searchability and usability of your submitted data will depend on how well you document these samples. Go to Samples | Register Samples and click Download spreadsheet to register samples to start the process.
Step 3a: Select sample checklist
The ENA sample checklists are partly overlapping sets of attributes (or data fields) that can be used to describe samples, and by selecting one of these you enable your sample metadata to be validated for correctness during submission. For environmental and organismal (host-associated) samples, alike, we recommend using one of the Environmental Checklists and, among these, to select the alternative from the Genomic Standards Consortium (GSC) MIxS checklists that provides the most specific match to your sampled environment, for example:
| Sampled environment | Recommended checklist |
|---|---|
| Air or general, above-ground, terrestrial | GSC MixS air |
| Epi- or endophytic (e.g. leaf, root) | GSC MIxS plant associated |
| Epi- or endozoic (e.g. spider gut, animal skin) | GSC MIxS host associated |
| Fresh- or seawater | GSC MixS water |
| Human gut / oral / skin / vaginal | GSC MIxS human gut / oral / skin / vaginal |
| Human non- gut / oral / skin / vaginal | GSC MIxS human associated |
| Sediment | GSC MixS sediment |
| Soil | GSC MixS soil |
Note that most GSC MIxS checklists have similar setups of mandatory and recommended attributes, i.e. differ mainly in terms of which optional attributes can be added and validated during submission. The environmental attributes altitude, elevation and depth, are mandatory only for some lists, however. Furthermore, the GSC MIxS built environment list (not mentioned above) has several unique mandatories.
Step 3b: Add sample attributes
Once you have selected a checklist, you can inspect the attributes available in that list. All Mandatory Fields are preselected, and you can add Optional Fields by ticking their boxes. We suggest that you, at least, tick the following optional attributes for metabarcoding data*:
| Checklist | Optional attribute |
|---|---|
| [ All ] | target gene |
| [ All ] | target subfragment |
| [ All ] | pcr primers |
| [ All ] | sequencing method |
| GSC MIxS host / plant associated | host taxid |
* Disclaimer: While target gene/subfragment and primers are typically associated with the (sequencing) experiment, ENA only lists these fields as optional at sample level. When queried about this, ENA suggests adding the fields to experiments through post-submission XML editing, but we consider this process too complex. Therefore, we still recommend adding them to your samples as outlined above. Please note, however, that if you’ve sequenced multiple targets (e.g., both 16S and 18S) using the same physical samples, you will then need to submit two sets of digital samples. If you choose this approach, please make it easy for data users to identify sequences originating from the same physical sample by adding sample aliases, such as [physical_sample_id]_16S and [physical_sample_id]_18S.
To ensure that metadata are validated and searchable, you should use existing attributes whenever possible, but you can also add custom attributes to describe your data, if needed (see Add custom field in top left corner of page. Write your field name before hitting the plus button). Adding more than a few of these is easier to do in a spreadsheet, though, and we explain how to do that in the next step.
Step 3c: Download spreadsheet template
After selecting optional attributes, click Next, and then the Download TSV Template button to download a tab-separated values (*.tsv) file. Open the file in your spreadsheet application of choice (In MS Excel, click Data | Text to Columns | Delimited | Delimiter: Tab, to separate text into columns, if needed). With the added optional attributes from 3b, a template created from the GSC MIxS water checklist should look like this:
| Checklist | ERC000024 | GSC MIxS water | |||||||||||||||
| tax_id | scientific_name | sample_alias | sample_title | sample_description | project name | target gene | target subfragment | pcr primers | sequencing method | collection date | geographic location (country and/or sea) | geographic location (latitude) | geographic location (longitude) | depth | broad-scale environmental context | local environmental context | environmental medium |
| #units | DD | DD | m |
Step 3d: Edit spreadsheet structure
In the downloaded spreadsheet, you can add custom attributes (with units, where applicable) to the right of existing columns, and samples below the row starting with #units. For instance, if you add two custom attributes (salinity [psu] and sampling_station_id), and three samples (xyz:1:01, xyz:1:02 and xyz:1:03) to the template from Step 3c, your spreadsheet structure should look like this:
| Checklist | ERC000024 | GSC MIxS water | |||||||||||||||||
| tax_id | scientific_name | sample_alias | sample_title | sample_description | project name | target gene | target subfragment | pcr primers | sequencing method | collection date | geographic location (country and/or sea) | geographic location (latitude) | geographic location (longitude) | depth | broad-scale environmental context | local environmental context | environmental medium | salinity | sampling_station_id |
| #units | DD | DD | m | psu | |||||||||||||||
| xyz:1:01 | |||||||||||||||||||
| xyz:1:02 | |||||||||||||||||||
| xyz:1:03 |
Remember to enter sample aliases that correspond to what you use in related publications. This will enable readers to find sample-specific metadata and read files, even if you only state a Project accession number in your paper. Sample aliases can, furthermore, be optionally displayed as Unique name in the Sample report.
Step 3e: Add sample metadata
Before adding actual sample metadata to your spreadsheet, take a close look at ENA’s explanations of selected attributes and lists of permitted values. These are available in the Sample Checklists browser. Also note the following:
- Taxon attributes for metabarcoding samples may be confusing. In this context, the tax_id & scientific_name attributes do not typically refer to sequenced organisms, but rather describe sampled organisms or environments. The scientific_name value spider metagenome is, for example, used to describe samples from a spider or spider body part, i.e. not samples from which you have derived spider sequences. The attributes tax_id & scientific_name should thus be selected from the list of environmental and organismal metagenomes in NCBI’s taxonomy browser. For host-associated samples, also differentiate between these generic attributes (i.e. tax_id & scientific_name) and host taxid, which you can also search for in NCBI’s taxonomy browser, and should be as specific as possible.
- Some attributes should be selected from ontologies. To increase searchability, some attribute values should be selected from designated ontologies, which are formal specifications of terms used in certain contexts, and of how these terms relate to each other. You can browse or search the latest versions of ontologies used in ENA submission using the EMBL-EBI Ontology Lookup Service (OLS). You can also use the following direct links as starting points for finding valid terms for some mandatory or recommended attributes in a GSC MixS checklists:
Checklist Ontology-linked attribute ENA description [ All ] broad-scale environmental context Report the major environmental system the sample or specimen came from. The system(s) identified should have a coarse spatial grain, to provide the general environmental context of where the sampling was done (e.g. in the desert or a rainforest). We recommend using subclasses of EnvO’s biome class: http://purl.obolibrary.org/obo/ENVO_00000428. EnvO documentation about how to use the field: https://github.com/EnvironmentOntology/envo/wiki/Using-ENVO-with-MIxS. [ All ] local environmental context Report the entity or entities which are in the sample or specimen’s local vicinity and which you believe have significant causal influences on your sample or specimen. We recommend using EnvO terms which are of smaller spatial grain than your entry for ‘broad-scale environmental context’. Terms, such as anatomical sites, from other OBO Library ontologies which interoperate with EnvO (e.g. UBERON) are accepted in this field. EnvO documentation about how to use the field: https://github.com/EnvironmentOntology/envo/wiki/Using-ENVO-with-MIxS. [ GSC MIxS non host / plant associated ] environmental medium Report the environmental material(s) immediately surrounding the sample or specimen at the time of sampling. We recommend using subclasses of ‘environmental material’ (http://purl.obolibrary.org/obo/ENVO_00010483). EnvO documentation about how to use the field: https://github.com/EnvironmentOntology/envo/wiki/Using-ENVO-with-MIxS . Terms from other OBO ontologies are permissible as long as they reference mass/volume nouns (e.g. air, water, blood) and not discrete, countable entities (e.g. a tree, a leaf, a table top). [ GSC MIxS host associated ] environmental medium (host) Report the environmental material(s) immediately surrounding the sample or specimen at the time of sampling. We recommend using subclasses of ‘environmental material’ (http://purl.obolibrary.org/obo/ENVO_00010483). EnvO documentation about how to use the field: https://github.com/EnvironmentOntology/envo/wiki/Using-ENVO-with-MIxS . Terms from other OBO ontologies are permissible as long as they reference mass/volume nouns (e.g. air, water, blood) and not discrete, countable entities (e.g. a tree, a leaf, a table top). [ GSC MIxS plant associated ] environmental medium (plant) Report the environmental material(s) immediately surrounding the sample or specimen at the time of sampling. We recommend using subclasses of ‘environmental material’ (http://purl.obolibrary.org/obo/ENVO_00010483). EnvO documentation about how to use the field: https://github.com/EnvironmentOntology/envo/wiki/Using-ENVO-with-MIxS . Terms from other OBO ontologies are permissible as long as they reference mass/volume nouns (e.g. air, water, blood) and not discrete, countable entities (e.g. a tree, a leaf, a table top). [ All ] sequencing method Sequencing machine used. Where possible the term should be taken from the OBI list of DNA sequencers (http://purl.obolibrary.org/obo/OBI_0400103). In the linked ontology tree views, click the plus sign next to a highlighted branch to show all instances of that term, and continue downwards until you find the most specific term that accurately describes your data. It is good practice to then register the term together with ontology acronym and accession, e.g: marine pelagic biome (ENVO:01000023).
- Environmental attributes of host-associated samples are ambiguous. For instance, a spider may, in some sense, be the environment from which a host-associated sample derives. But as the external environment also may be of interest here, we tentatively suggest that you interpret broad-scale and local environmental context the same way as for non-host-associated samples, and use the most specific instance of material anatomical entity (UBERON:0000465) or plant anatomical entity (PO:0025131) for the environmental medium attribute of host- and plant associated samples, respectively.
- Geographic positions should be given in decimal degrees (DD). If conversion is needed, use an online tool, such as the PGC Coordinate Converter, or the following formula:
Decimal Degrees = Degrees + Minutes/60 + Seconds/3600 Ex: 58°11’12.34’’ = 58 + 11/60 + 12.34/3600 = 58.1868° Ex: 58°11.21’ = 58 + 11.21/60 = 58.1868° The related Geographic location (country and/or sea) attribute should be selected from the INSDC list for countries and seas.
Step 3f: Upload spreadsheet
With data added, your spreadsheet should look similar to this (admittedly, we have added a manufacturer name to the sequencing method ontology term, as it seemed to be missing from this specific device):
| Checklist | ERC000024 | GSC MIxS water | |||||||||||||||||
| tax_id | scientific_name | sample_alias | sample_title | sample_description | project name | target gene | target subfragment | pcr primers | sequencing method | collection date | geographic location (country and/or sea) | geographic location (latitude) | geographic location (longitude) | depth | broad-scale environmental context | local environmental context | environmental medium | salinity | sampling_station_id |
| #units | DD | DD | m | psu | |||||||||||||||
| 1874687 | marine plankton metagenome | xyz:1:01 | Microbial plankton sample 1 | Microbial plankton diversity along Baltic salinity gradient July 2018 | 16S rRNA | V3-V4 | 341F (CCTACGGGNGGCWGCAG) and 805R (GACTACHVGGGTATCTAATCC) | Illumina MiSeq | 2018-07-23 | Baltic Sea | 61.407611 | 19.472809 | 3 | marine pelagic biome (ENVO:01000023) | brackish water body (ENVO:01001321) | brackish water (ENVO:00002019) | 3.13 | A13 | |
| 1874687 | marine plankton metagenome | xyz:1:02 | Microbial plankton sample 2 | Microbial plankton diversity along Baltic salinity gradient July 2018 | 16S rRNA | V3-V4 | 341F (CCTACGGGNGGCWGCAG) and 805R (GACTACHVGGGTATCTAATCC) | Illumina MiSeq | 2018-07-24 | Baltic Sea | 62.805337 | 19.912262 | 3 | marine pelagic biome (ENVO:01000023) | brackish water body (ENVO:01001321) | brackish water (ENVO:00002019) | 5.64 | A14 | |
| 1874687 | marine plankton metagenome | xyz:1:03 | Microbial plankton sample 3 | Microbial plankton diversity along Baltic salinity gradient July 2018 | 16S rRNA | V3-V4 | 341F (CCTACGGGNGGCWGCAG) and 805R (GACTACHVGGGTATCTAATCC) | Illumina MiSeq | 2018-07-25 | Baltic Sea | 64.970396 | 23.076324 | 3 | marine pelagic biome (ENVO:01000023) | brackish water body (ENVO:01001321) | brackish water (ENVO:00002019) | 6.1 | A15 |
If so, go back to Samples | Register Samples, click Upload filled spreadsheet to register samples, select your edited *.tsv file, and click Submit Completed Spreadsheet. Given that your spreadsheet structure is correct, you will receive a confirmation message, and your samples should now be listed under Samples | Samples Report. Note that you need to click Show unique name to display sample aliases there.
Step 4: Prepare and upload read files
Before starting submission of reads and experiment data, you need to prepare and upload read files to your own directory in the Webin file upload area. We assume that you have paired-end reads in FASTQ format, like the example files from the mothur MiSeq SOP that we use below, but please refer to ENA’s guidelines on file formats for other options:
Step 4a: Compress files and calculate checksums
On a Mac, open the Terminal app (in Applications | Utilities), and do the following:
# Go to read file directory
# Tip: type 'cd ' and then drag/drop folder from Finder into Terminal
cd ~/your-read-file-dir

# Compress read files, if they are uncompressed (edit file extension as needed)
gzip -k *.fastq
To enable verification of file integrity after upload, calculate the md5 checksum of each (compressed) read file:
# Calculate and print md5 sums to tab-separated file (for easy cut-and-paste later)
for f in *.gz; do md5 $f | awk '{ gsub(/\(|\)/,""); print $2"\t" $4 }'; done > md5sums.tsv
The resulting file should look similar to this:
| F3D148_S214_L001_R1_001.fastq.gz | bb8f57f8a94050de3d8ad47d03477e68 |
| F3D148_S214_L001_R2_001.fastq.gz | d71d368d056b1d4bcf0ea74628f4d63a |
| F3D149_S215_L001_R1_001.fastq.gz | f76e0d9366998f7509a7aaca640cc842 |
| F3D149_S215_L001_R2_001.fastq.gz | 6c9acb1f743d984e07a9ce6b35b0fb6a |
| F3D150_S216_L001_R1_001.fastq.gz | e869e2b2bff6cd6c5dbe8f1b1d22d5bc |
| F3D150_S216_L001_R2_001.fastq.gz | f3c6d5a3dae027187ff5f80100d37482 |
The md5sum command should work similarly on a Linux machine, but Windows users may need to install some application to compress files to *.gz format, and do a quick web search for how to generate MD5 checksum for file on Windows.
Step 4b: Upload read files to ENA
You can now upload your sequence reads to ENA’s transit area, but remember to keep local copies of your data. There are several FTP (File Transfer Protocol) clients available for file transfer. We describe one alternative (lftp) for Mac users, but please refer to ENA’s guidelines on file upload for other options:
# Connect to FTP server [replace X:s, and provide password when prompted]
lftp webin2.ebi.ac.uk -u Webin-XXXXX
# Expected response: lftp Webin-XXXXX@webin2.ebi.ac.uk:~>

# Transfer your read files
mput ~/your-read-file-dir/*.fastq.gz
# Expected response: ... Total x files transferred

# Disconnect from server
bye
Step 5: Submit sequence reads
Once you have successfully uploaded your sequence reads, you need to associate them with already submitted sample metadata, as well as describe the sequencing experiment that produced the read files. In the ENA metadata model, an experiment refers to a sequencing event, and contains information on e.g. library construction and instruments, whereas runs represent the read files resulting from an experiment.
Step 5a: Download the experiment/run template
Go to Raw Reads (Experiments and Runs) | Submit Reads, click Download spreadsheet template for Read submission, and select your file format. We assume you want to Submit paired reads using two Fastq files, here. Again, Mandatory Fields have been pre-selected for you, but you can also add Optional Fields. Have a look at permitted values before downloading your template (or simply return to this page later).
Your downloaded spreadsheet template should look something this:
| FileType | fastq | Read submission file type | |||||||||
| sample | study | instrument_model | library_name | library_source | library_selection | library_strategy | library_layout | forward_file_name | forward_file_md5 | reverse_file_name | reverse_file_md5 |
Step 5b: Describe experiment and runs
In your downloaded template, you need to link each experiment/run row to an already submitted sample and study by adding the correct Sample and Study Accession values under the sample and study headers. Then, for metabarcoding data, you would typically use the following values to describe sequenced libraries (but see ENA’s guidelines on experiment metadata for all available options):
- library source: METAGENOMIC
- library selection: PCR
- library strategy: AMPLICON
Also add the following metadata for read files:
- forward [reverse]_file_name: If you put your read files directly into your account (in step 4b), you add filenames only here. Otherwise, enter paths including all subdirectories.
- forward [reverse]_file_md5: Paste the md5 checksums from Step 4a.
Your spreadsheet should now look similar to this (but add as much optional metadata as possible):
| FileType | fastq | Read submission file type | |||||||||
| sample | study | instrument_model | library_name | library_source | library_selection | library_strategy | library_layout | forward_file_name | forward_file_md5 | reverse_file_name | reverse_file_md5 |
| ERS8208349 | PRJEB48461 | Illumina MiSeq | 16S rRNA amplicon of Sample 1 | METAGENOMIC | PCR | AMPLICON | PAIRED | F3D148_S214_L001_R1_001.fastq.gz | bb8f57f8a94050de3d8ad47d03477e68 | F3D148_S214_L001_R2_001.fastq.gz | d71d368d056b1d4bcf0ea74628f4d63a |
| ERS8208348 | PRJEB48461 | Illumina MiSeq | 16S rRNA amplicon of Sample 2 | METAGENOMIC | PCR | AMPLICON | PAIRED | F3D149_S215_L001_R1_001.fastq.gz | f76e0d9366998f7509a7aaca640cc842 | F3D149_S215_L001_R2_001.fastq.gz | 6c9acb1f743d984e07a9ce6b35b0fb6a |
| ERS8208347 | PRJEB48461 | Illumina MiSeq | 16S rRNA amplicon of Sample 3 | METAGENOMIC | PCR | AMPLICON | PAIRED | F3D150_S216_L001_R1_001.fastq.gz | e869e2b2bff6cd6c5dbe8f1b1d22d5bc | F3D150_S216_L001_R2_001.fastq.gz | f3c6d5a3dae027187ff5f80100d37482 |
If so, go back to Raw Reads (Experiments and Runs) | Submit reads, click Upload filled spreadsheet template for Read submission, select your edited *.tsv file, and click Submit Completed Spreadsheet. If your submission is confirmed, you should now be able to se your submitted runs in the Raw Reads (Experiments and Runs) | Run Files Report.
Step 6: Submit to production service
After careful inspection of metadata, you can now repeat the process in the production version of the Webin interface.
Sequin for Database Submissions
Sequin is a stand-alone software tool developed by the NCBI for submitting and updating sequences to the GenBank, EMBL, and DDBJ databases. Sequin has the capacity to handle long sequences and sets of sequences (segmented entries, as well as population, phylogenetic, and mutation studies). It also allows sequence editing and updating, and provides complex annotation capabilities. In addition, Sequin contains a number of built-in validation functions for enhanced quality assurance.
This overview is intended to provide a quick guide to Sequin’s capabilities, including automatic annotation of coding regions, the graphical viewer, quality control features, and editing features. We suggest that you read this entire document before beginning your Sequin submission. More detailed instructions on these and other functions can be found in Sequin’s on-screen Help file, also available on the World-Wide Web from the Sequin home page at:
http://www.ncbi.nlm.nih.gov/Sequin/
E-mail help is also available from info@ncbi.nlm.nih.gov
Basic Sequin Organization
Sequin is organized into a series of forms to (1) enter submitting authors, (2) enter organism and sequences, (3) enter information such as strain, gene, and protein names, (4) view the complete submission, and (5) edit and annotate the submission. The goal is to go quickly from raw sequence data to an assembled record that can be viewed, edited, and submitted to your database of choice.
Advance through the pages that comprise each form by clicking on labeled folder tabs or the Next Page button. After the basic information forms have been completed and the sequence data imported, Sequin provides a complete view of your submission, in your choice of text or graphic format. At this point, any of the information fields can be easily modified by double-clicking on any area of the record, and additional biological annotations can be entered by selecting from a menu.
Sequin has an on-screen Help file that is opened automatically when you start the program. Because it is context-sensitive, the Help text will change and follow your steps as you progress through the program. A “Find” function is also provided.
Preparing Nucleotide and Amino Acid Data
Sequin normally expects to read sequence files in FASTA format. Note that most sequence analysis software packages include FASTA or “raw” as one of the available output formats. Population, phylogenetic, and mutation studies can also be entered in PHYLIP, NEXUS, MACAW, or FASTA+GAP formats.
See http://www.ncbi.nlm.nih.gov/Sequin/faq.html#Orgnameforphyl or “Sample Data Files” for detailed examples of each of the various input data formats.
Prepare your sequence data files using a text editor, and save in ASCII text format (plain text). If your nucleotide sequence encodes one or more protein products, Sequin expects two files, one for the nucleotides and one for the proteins.
FASTA format is simply the raw sequence preceded by a definition line. The definition line begins with a > sign, and is followed immediately by a name for the sequence (your own local identification code, or local ID) and a title. During the submission process, indexing staff at the database to which you are submitting will change your local ID to an accession number. You can embed other important information in the title, and Sequin uses this information to construct a record. Specifically, you can enter organism and strain or clone information in the nucleotide definition line, and gene and protein information in the protein definition line. Examples for the nucleotide and protein files are shown here:
>eIF4E [organism=Drosophila melanogaster] [strain=Oregon R] Drosophila ...
CGGTTGCTTGGGTTTTATAACATCAGTCAGTGACAGGCATTTCCAGAGTTGCCCTGTTCA ...

>4E-I [gene=eIF4E] [protein=eukaryotic initiation factor 4E-I]
MQSDFHRMKNFANPKSMFKTSAPSTEQGRPEPPTSAAAPAEAKDVKPKEDPQETGEPAGN ...
>4E-II [gene=eIF4E] [protein=eukaryotic initiation factor 4E-II]
MVVLETEKTSAPSTEQGRPEPPTSAAAPAEAKDVKPKEDPQETGEPAGNTATTTAPAGDD ...
The ability to embed this information in the definition line is provided as a convenience to the submitter. If these annotations are not present, they can be entered in subsequent forms. Sequin is designed to use this information, and that provided in the initial forms, to build a properly-structured record. In many cases, the final submission can be completely prepared from these data, so that no additional manual annotation is necessary once the record is displayed.
See http://www.ncbi.nlm.nih.gov/Sequin/faq.html#Biosrcmod for a complete list of definition line modifiers.
In this example we show alternative splicing, where a single gene produces multiple messenger RNAs which encode two similar but distinct protein products.
Note that the [ and ] brackets actually appear in the text. (Brackets are sometimes used in computer documentation to denote optional text. This convention is not followed here.) The bracketed information will be removed from the definition line for each sequence. Sequin can also calculate a new definition line by computing on features in the annotated record (see “Generating the Definition Line“).
Also, please note that there must be a line break (carriage return) between the definition line and the first line of sequence. Some word processors will break a single line onto two lines without actually adding a carriage return. (This feature is known as “word wrapping.”) If you are unsure whether there is a carriage return, you can either set up your word processor so it shows invisible characters like carriage returns, or view the file in a text editor which does not create artificial line breaks. The definition line itself must not have a line break within it, since the second line would then be misinterpreted as the beginning of the sequence data. The actual sequence is usually broken every 50 to 80 characters, but this is not necessary for Sequin to be able to read it.
Segmented Nucleotide Sets
A segmented nucleotide entry is a set of non-contiguous sequences which has a defined order and orientation. For example, a genomic DNA segmented set could include encoding exons along with fragments of their flanking introns. An example of an mRNA segmented pair of records would be the 5′ and 3′ ends of an mRNA where the middle region has not been sequenced. In order to import nucleotides in a segmented set, each individual sequence must be in FASTA format with an appropriate definition line, and all sequences should be in the same file. The file containing the sequences is imported into Sequin as described later.
Population, Phylogenetic or Mutation Studies
For phylogenetic studies, the scientific name of each organism should be encoded in each FASTA definition line, e.g., [organism=Mus musculus]. For population studies, you can encode strain, clone, and isolate information in the definition line, e.g., [strain=BALB/c]. For these studies, PHYLIP, NEXUS, MACAW, and FASTA+GAP formats (see “Sample Data Files“) can also be read. (All of these formats require a unique sequence identifier, i.e., a local ID.) A sample FASTA+GAP file for a phylogenetic study is shown here:
>Dmel28S [organism=Drosophila melanogaster]
AUUCUGGUUAACUCUAAGCGGUGGAUCACUCGGCUCAUGGGUCGAUGAAGAACGCAGC--
AAACUGUGCGUCAUCGUGUGAACUGCAGGACACAU-GAACAUCGACAUUUUGAACGCAUA
UCG-----------CAGU-------CCAUGCU-GUUAUA----------UACAACCUCAA
>Xlae28S [organism=Xenopus laevis]
-----UCGCGACUCUUAGCGGUGGAUCACUCGGCUCGUGCGUCGAUGAAGAACGCAGC--
UAGCUGCGAGAAUUAGUGUGAAUUGCAGA-CACAUUGAUCAUCGACACUUCGAACGCACC
UUGCGGCCCCGGGUUCCUCCCGGGGCCACGCCUGUCUGAGGGUCGCUCCUCAGACCUCAG
>Mmus28S [organism=Mus musculus]
--------CGACUCUUAGCGGUGGAUCACUCGGCUCGUACGUCGAUGAAGAACGCAGC--
UAGCUGCGAGAAUUAAUGUGAAUUGCAGA-CACAUUGAUCAUCGACACUUCGAACGCACU
U-GCGGCCCCGGGUUCCUCCCGGGGCUACGCCUGUCUGAGCGUCGCUUC-GCGACCUCAG
>Hsap28S [organism=Homo sapiens]
--------CGACUCUUAGCGGUGGAUCACUCGGCUCGUGCGUCGAUGAAGAACGCAGCGC
UAGCUGCGAGAAUUAAUGUGAAUUGCAGA-CACAUUGAUCAUCGACACUUCGAACGCACU
U-GCGGCCCCGGGUUCCUCCCGGGGCUACGCCUGUCUGAGCGUCGCUUC-GCGACCUCAG
One could add “28S ribosomal RNA gene, partial sequence” as a title to all sequences using the Annotation page of the Organism and Sequences form, and could also ask that the correct organism name be prefixed to each title. (Sequin will convert the U (uracil) characters into T (thymine) automatically.)
Sets of Segmented Sequences
If the sequences in a phylogenetic study are really segmented (e.g., ITS1 and ITS2 of ribosomal RNA without the intervening 5.8S rRNA sequence), the individual segments from a single organism can be grouped within square brackets. Subsequent segments are detected by the presence of a FASTA definition line. For example:
[
>QruITS1 [organism=Quercus rubra]
CGAAAACCTGCACAGCAGAAACGACTCGCAAACTAGTAATAACTGACGGAGGACGGAGGG ...
>QruITS2
CATCATTGCCCCCCATCCTTTGGTTTGGTTGGGTTGGAAGTTCACCTCCCATATGTGCCC ...
]
[
>QsuITS1 [organism=Quercus suber]
CAAACCTACACAGCAGAACGACTCGAGAACTGGTGACAGTTGAGGAGGGCAAGCACCTTG ...
>QsuITS2
CATCGTTGCCCCCCTTCTTTGGTTTGGTTGGGTTGGAAGTTGGCCTTCCATATGTGCCCT ...
]
...
FASTA+GAP format can also use this convention for encoding sets of segmented sequences.
The sequence data we will use for this example is the genomic sequence of the Drosophila melanogaster eukaryotic initiation factors 4E-I and 4E-II (GenBank accession number U54469).
Welcome to Sequin Form
Once you have finished preparing the sequence files, you are ready to start the Sequin program. Sequin’s first window asks you to indicate the database to which the sequence will be submitted, and prompts you to start a new project or continue with an existing one. Once you choose a database, Sequin will remember it in subsequent sessions. In general, each sequence submission should be entered as a separate project. However, segmented DNA sequences, population studies, phylogenetic studies, and mutation studies, should be submitted together as one project. This feature also eliminates the need to save Sequin information templates for each sequence.
See http://www.ncbi.nlm.nih.gov/Sequin/netaware.html or “Network Configuration” for instructions on how to make Sequin “network-aware”. When connected to the Internet, Sequin also allows you to download a record from Entrez. If you are the original submitter of this record, you can use Sequin to edit the sequence or add further annotations to the record.
Submitting Authors Form
The pages in the Submitting Authors form ask you to provide the release date, a working title, names and contact information of submitting authors, and affiliation information. To create a personal template for use in future submissions, use the File/Export option after completing each page of this form.
The Submission page asks for a tentative title for a manuscript describing the sequence, and will initially mark the manuscript as being unpublished. When the article is published, the database staff will update the sequence record with the new citation. This page also lets you indicate that a record should be held until it is published, although the preferred policy is to release the record immediately into the public databases.
The Contact page asks for the name, phone number, and e-mail address of the person responsible for making the submission. Database staff members will contact this person if there are any questions about the record.
The Sfx (suffix) field should be filled with personal name suffixes (e.g., Jr., Sr., or 3rd), not with a person’s academic degrees (e.g., M.D. or Ph.D.). And it is not necessary to type periods after initials or suffixes.
In the Authors page, enter the names of the people who should get scientific credit for the sequence presented in this record. These will become the authors for the initial (unpublished) manuscript.
Authors are entered in a spreadsheet. As soon as anything is typed in the last row, a new (blank) row is added below it. Use the tab key to move between fields. Tabbing from the Sfx (suffix) column automatically moves to the First Name column in the next row. Again, suffix is for personal suffixes (e.g., Jr. or Sr.), not academic degrees.
The Affiliation page asks for the institutional affiliation of the primary author.
Sequence Format Form
With Sequin, the actual sequence data are imported from an outside data file. So before you begin, prepare your sequence data files using a text editor, perhaps one associated with your laboratory sequence analysis software (see “Before you Begin“).
The traditional submission is of a single nucleotide sequence containing one or more genes and encoding one or more proteins. Data files should be prepared in FASTA format. Segmented sequences, e.g., where several exons have been sequenced but the complete introns are not yet sequenced, may also be submitted, with the individual nucleotide segments in FASTA format combined into one file.
Sequin will also accept population, phylogenetic, or mutation studies, and environmental samples, in which genes from many individuals or organisms are sequenced. The data for these can be entered in FASTA format, but they can also be entered in Contiguous or Interleaved formats (e.g., PHYLIP, NEXUS, MACAW, or FASTA+GAP), which contain alignment information as well as the sequences. For this example, FASTA format will be used.
The batch submission choice is provided to accommodate submission of unrelated sequences, where no alignment is present or should be calculated.
One powerful feature of Sequin is that the program can automatically annotate the name of the organism, strain, gene, protein product, and other information on your sequence and coding regions. You can supply this information in the FASTA definition line between square brackets, e.g., [organism=Mus musculus] [strain=BALB/c] for the nucleotide and [gene=ins] [protein=insulin] for the protein.
It is much easier to produce the final submission if you let Sequin work for you in this manner.
Organism and Sequences Form
The first page of this form requests information regarding the scientific name of the organism from which the sequence was derived, if it was not already encoded in the nucleotide FASTA file. Organism information is most easily entered by selecting the appropriate organism from the scrollable list. As you begin typing the scientific name, the list will jump to the right alphabetical location. Click on the list to finish the selection.
Once you select an organism from the list, the corresponding scientific and common names and genetic code are filled out automatically. If you then choose Mitochondrion as the sequence location, the alternative genetic code for that organism will be used. If your organism is not on the list, Sequin will simply accept the scientific name you have typed; you should then manually set the genetic code used for translation. This will later be verified by the database staff using a more complete taxonomic database. (Sequin only holds the top 800 organisms, while more than 40,000 are actually present in GenBank.)
Note: For phylogenetic studies, you may annotate each FASTA definition line with [organism=scientific name] information (see “Before you Begin“), and you would not need to fill in the Organism page. When phylogenetic study has been selected as the sequence format, in fact, this page is replaced by a notice explaining how to place the organism name in the definition line. In that case you should enter the location of the sequence and the default genetic code. Similarly, in a single sequence, if you embed [organism=scientific name] in the definition line (usually along with other modifiers, such as strain or clone), you can skip this page.
Importing Nucleotide FASTA Files
To import the nucleotide sequence data, click on the Nucleotide folder tab or the Next Page button to advance to the next page. Select molecule type and topology, check any additional boxes that apply, then click on Import Nucleotide FASTA and select the appropriate file.
It is most convenient to place the multiple segments of a segmented sequence, or the individual sequences of a population, phylogenetic, or mutation study, in a single file. However, they can also be kept in separate files. In this case you would repeat the import step for each file. (In addition to importing from a file, sequences can also be read by pasting from the computer’s “clipboard”.)
When the sequence file import is complete, a box will appear showing the number of nucleotide segments imported, the total length in nucleotides of the sequences entered, and the local ID(s) you designated. The actual sequence data are not shown. If any of this information is missing or incorrect, check the file containing the sequence data for proper FASTA format, choose Clear from the Edit menu, then reimport the sequence(s).
The format for annotating the nucleotide FASTA definition line is shown below:
>ID [organism=scientific name] [strain=strain name] title
Sequin has extracted the organism and strain names from the FASTA definition line in this example, eliminating the need to fill out the Organism page.
Importing Protein FASTA Files
If you have specified a single sequence or segmented nucleotide sequence, and if it encodes one or more proteins, you can enter the sequences of the protein products in this page. To import the amino acid sequence, click on the Proteins folder tab and proceed in the same manner as for nucleotide data.
In this example, we imported two protein sequences. These are the alternative splice products of the same gene. Both protein sequences were in the same data file, but each had its own definition line with its own unique local ID.
The format for annotating the protein FASTA definition line is shown below:
>ID [gene=gene name] [protein=protein name] title
Sequin has extracted the gene and protein names from the FASTA definition lines, and will use these to construct the initial sequence record.
Annotating Population/Phylogenetic/Mutation/Environmental Sets
If you have specified a population, phylogenetic, or mutation study or environmental sample, the Annotation folder tab replaces the Proteins folder tab. This page allows you to add an rRNA or CDS feature to the entire length of all sequences in the set. In addition, you can add a title to any sequences that didn’t obtain them from a FASTA definition line. It is much easier to add these in bulk at this step than to add individual rRNA or CDS features to each sequence after the record is constructed.
It is customary in a nucleotide record to format titles for sequences containing coding region features in the following way:
Genus species protein name (gene symbol) mRNA/gene, complete/partial cds.
The choice of “mRNA” or “gene” depends upon the molecule type (use “mRNA” for mRNA or cDNA, and “gene” for genomic DNA). Use “partial” for incomplete features. The proper organism name in a phylogenetic study can be added to the beginning of each title automatically by checking the Prefix title with organism name box.
However, for records containing with CDS, rRNA, or tRNA features, Sequin can generate the definition line automatically by computing on the features (see “Generating the Definition Line“).
More complex situations, such as a population study of HIV sequences, can include multiple CDS features in each sequence. In this case, do not use the Annotation page to create features. (You can still use it for a common title, however.) After the initial submission has been created, you would manually annotate features onto one of the sequences. Feature propagation through an alignment can then be used to annotate the same features at the equivalent locations on the remaining sequences.
Entering Gene and Protein Information
In the protein FASTA definition line you can embed [gene=…] and [protein=…]. If this information was not entered in the definition line, Sequin will display the following form for each protein sequence, allowing you to fill in the missing information manually.
Entering Organism and Source Modifiers
In the nucleotide FASTA definition line you can embed [organism=scientific name] and modifiers from the following list (all in the format [modifier=…]): acronym, anamorph, authority, biotype, biovar, breed, cell-line, cell-type, chemovar, chromosome, clone, clone-lib, country, cultivar, dev-stage, dosage, ecotype, endogenous-virus-name, forma, forma-specialis, frequency, genotype, group, haplotype, ins-seq-name, isolate, lab-host, lineage, map, natural-host, pathovar, plasmid-name, plastid-name, pop-variant, segment, serogroup, serotype, serovar, sex, specimen-voucher, strain, sub-clone, sub-group, sub-species, sub-strain, subtype, synonym, teleomorph, tissue-lib, tissue-type, transposon-name, type, and variety. For example, [organism=Homo sapiens] [cell-line=HeLa]. Some population studies are a mixture of integrated provirus and excised virion. These can be indicated by molecule and location qualifiers. For example, [molecule=dna] [location=proviral] or [molecule=rna] [location=virion]. You can also embed [moltype=genomic] or [moltype=mRNA] to indicate from what source the molecule was isolated. If you’re unsure of which modifier to use, use [note=…], and database staff will determine the appropriate modifier to use.
For population, phylogenetic, or mutation studies, Sequin presents a form to allow this information to be edited (if it had been entered in the FASTA file), or entered in the first place, before it constructs the sequence record. In addition to organism name, you can enter any kind of source modifer in this form.
GenBank View
After you have completed importing the data files, Sequin will display your full submission information in the GenBank format (or EMBL format if you chose EMBL as the database for submission in the first form).
Based on information provided in your DNA and amino acid sequence files, any coding regions will be automatically identified and annotated for you. The figure shows only the top portion of the GenBank record, but you can see the first of two coding region (CDS) features. The vertical bar to the left of the paragraph indicates that the CDS has been selected by clicking with the computer’s mouse.
There are also three mRNA features (not shown in the figure) that were generated by copying the cDNA feature intervals and editing them to include the 5′ and 3′ UTRs. Also, the journal citation, originally listed as “Unpublished”, has been updated now that the article has been published. Chromosome and map information have also been added to the biological source feature. These changes were initiated by double clicking on the appropriate paragraphs in the GenBank display format. Finally, Sequin was asked to generate the definition line by computing on the annotated features.
Graphical View
To get a graphical view, use the Display Format pop-up menu to change from GenBank to Graphic. Reviewing your submission in Graphic format allows you to visually confirm expected location of exons, introns, and other features in multiple interval coding regions. The Graphic view in our eukaryotic initiation factor example illustrates how the coding region intervals for the two protein products are spatially related to each other.
The Duplicate View item in the File menu will launch a second viewer on the record. The display format on each viewer can be independently set, allowing you to see a graphical view and a GenBank text report simultaneously. This is useful for getting an overall view of the features and seeing the details of annotation.
Sequence View
Sequence view is a static version of the sequence and alignment editor. It shows the actual nucleotide sequence, with feature intervals annotated directly on the sequence. Protein translations of CDS features are also shown, as are all features shown in the graphical view. Intronic regions within protein translations are shown as a series of tilde (~) characters.
Editing and Annotating Your Submission
At this point, Sequin could process your entry based on what you have entered so far, and you could send it to your nucleotide database of choice (as set in the initial form). However, to optimize usefulness of your entry for the scientific community, you may wish to provide additional information to indicate biologically significant regions of the sequence. But first, save the entry so that if you make any unwanted changes during the editing process you can revert to the original copy.
Additional information may be in the form of Descriptors or Features. (Descriptors are annotations that apply to an entire sequence or set of sequences. Features are annotations that apply to a specific sequence interval.)
Sequin provides two convenient methods to modify your entry: (1) to edit existing information, double click on the text or graphic area you wish to modify, and Sequin will display forms requesting needed information; or (2) to add new information, use the Annotate menu and select from the list of available annotations.
Sequence Editor
Additional sequence data can also be added using Sequin’s powerful sequence editor. Sequin will automatically adjust feature intervals when editing the sequence. Prior to Sequin, it was usually easier to reannotate everything from scratch when the sequence changed. But an even easier way to update sequences is described in the following section.
Updating the Sequence
Sequin can also read in a replacement sequence, or an overlapping sequence extension, and perform the alignment and feature propagation calculations necessary to adjust feature intervals, even though the individual editing operations were not done with the sequence editor.
The Update Sequence submenu within the Edit menu has several choices. These are for use by the original submitter of a record.
You can read a FASTA file or raw sequence file. This can be a replacement sequence, or it can overlap the original sequence at the 5′ or 3′ end. After Sequin aligns the two sequences, you then select replace or merge, as appropriate, and the sequence in your record is updated, with all feature intervals adjusted properly.
You can also update with an existing sequence record that contains features. This can be obtained from a file, or retrieved from Entrez either via an accession number or by selecting an alignment after running PowerBLAST. The latter two choices require the network-aware version of Sequin. Once it gets the new record, Sequin aligns the two sequences as before. This is typically used either to merge two records that overlap, or to copy features from database records onto a new large contig.
Generating the Definition Line
The Generate Definition Line item in the Annotate menu can make the appropriate titles once the record has been annotated with features. The general format for sequences containing coding region features is:
Genus species protein name (gene symbol) mRNA/gene, complete/partial cds.
Exceptional cases, where this automatic function is unable to generate a reasonable definition line, will be edited by the database staff to conform to the style conventions.
The new definition line will replace any previous title, including that originally on the FASTA definition line.
Validation
Once you are satisfied that you have entered all the relevant information, save your file! Then select Validate under the Search menu. You will either receive a message that the validation test succeeded or see a screen listing the validation errors and warnings. Just double click on an error item to launch the appropriate editor for making corrections. See the Sequin Help text for more information on correcting errors. The validator includes checks for such things as missing organism information, incorrect coding region lengths, internal stop codons in coding regions, inconsistent genetic codes, mismatched amino acids, and non-consensus splice sites.
Submitting the Entry
When the entry is properly formatted and error-free, click the Done button or select Prepare Submission under the File menu. You will be prompted to save your entry and e-mail it to the database you selected. The address for GenBank is gbsub@ncbi.nlm.nih.gov. The address for EMBL is datasubs@ebi.ac.uk. The address for DDBJ is ddbjsub@ddbj.nig.ac.jp.
Feature Editor Design
Sequin uses a common structure for all feature editor forms, with (usually) three top-level folder tabs. One folder tab page is specific to the given feature type (biological source and publications have more). The Properties and Location pages are common to all features. Some of these pages may have subpages, accessed by a secondary set of smaller folder tabs. This organization allows editors for complex data structures to fit in a reasonably small window size. The most important information in a given section is always presented in the first subpage.
Coding Region Page
The coding region editor is perhaps the most complicated form in Sequin. Within the Coding Region page, the Product subpage lets you predict the coding region intervals from the protein sequence or translate the protein sequence from the location. (Importing a protein sequence from a file will also interpret the [gene=…] and [protein=…] definition line information and automatically attempt to predict the coding region intervals.) It also displays the genetic code used for translation and the reading frame. (Please note that there are currently 13 different genetic codes present in Sequin. For more information on these, see http://www.ncbi.nlm.nih.gov/Taxonomy/.)
The Protein subpage lets you set the name (or, if not known, a description) of the protein product. The Exceptions subpage allows you to indicate translation exceptions to the normal genetic code, such as insertion of selenocysteine, suppression of terminator codons by a suppressor tRNA, or completion of a stop codon by poly-adenylation of an mRNA.
Additional annotation on the protein product might include a leader peptide, transmembrane regions, disulfide bonds, or binding sites. These can be added after setting the Target Sequence popup on the sequence viewer to the desired protein sequence. You can also launch a duplicate view, already targeted to the appropriate protein, from the Protein subpage.
Properties Page
All features have a number of fields in common. Check the Partial box to indicate that the range of the feature extends beyond the length of the sequence. (You would usually also check the 5' Partial or 3' Partial boxes in the Location page.) Exception means that the sequence of the protein product doesn’t match the translation of the DNA sequence because of some known biological reason (e.g., RNA editing). Evidence can be experimental or non-experimental. For a coding region, the isolation of an mRNA or cDNA in the laboratory is sufficient to justify setting this box to Experimental.
In addition, nucleotide features (other than genes themselves) can reference a gene feature. This is frequently done by overlap. (The overlapping gene will show up on the feature as a /gene qualifier in GenBank format.) Extension of the feature location will automatically extend the gene that is selected in the editor. In rare cases, you may want to set a gene by cross-reference. For example, the mRNA for the lac operon in E. coli could indicate the lacIZYA gene by cross-reference, and the four coding regions would be overlapped by the lacI, lacZ, lacY and lacA genes.
The Comment subpage allows text to be associated with a feature. In GenBank format, this appears as a /note qualifier. The Citations subpage attaches citations to the feature. (The citations should first be added to the record using items in the Publication submenu of the Annotate menu, whereupon it will appear in the REFERENCE section.) For example, an article that justifies a non-obvious or controversial biological conclusion would be cited here. In GenBank format, for example, if the publication is listed as Reference 2, the feature citation appears as /citation=[2]. Cross-Refs are cross-references to other databases. The contents of this subpage may only be changed by the GenBank, EMBL, or DDBJ database staff.
Location Page
All features are required to have a location, i.e., one or more intervals on a sequence coordinate. The Location page provides a spreadsheet for entering and editing this information. An arbitrary number of lines can be entered. In this coding region example, the intervals correspond to the exons. For an mRNA, the intervals would be the exons and UTRs. The 5' Partial and 3' Partial check boxes will show up as < or > in front of a feature coordinate in the GenBank flat file, indicating partial locations.
The GenBank flat file view of this location would be:
join(201..224,1550..1920,1986..2085,2317..2404,2466..2629)
If the 5′ Partial or 3′ Partial boxes were checked, < and > symbols would appear at the appropriate end of the join statement:
join(<201..224,1550..1920,1986..2085,2317..2404,2466..>2629)
If the sequence was reverse complemented (based on a length of 2881 nucleotides), the Strand popups would all indicate Minus, and the join statement for the resulting feature location would be as follows:
complement(join(253..416,478..565,797..896,962..1332, 2658..2681))
NCBI DeskTop
The NCBI DeskTop is a window that directly displays the internal structure of the record being viewed in Sequin. It can be understood as a Venn diagram. It is only meant for advanced users.
As with other views on a record, the DeskTop indicates selected items, and lets you select items by clicking. Selected items can then be the target of actions chosen from the Filter menu. Drag and drop can be used to add, rearrange, or remove items in a record.
In this example, Sequin was given the genomic nucleotide, cDNA, and protein sequences for Drosophila eukaryotic initiation factor 4E. It then determined the mRNA and coding region intervals, and built an initial structure. The organism (BioSource descriptor) is at the nuc-prot set, and thus applies to both the nucleotide and protein sequences.
Additional Information
The Sequin home page http://www.ncbi.nlm.nih.gov/Sequin/ has a Frequently Asked Questions section, and more detailed instructions on using the capabilities of network-aware Sequin.
Related posts:
![aminoacidproperties]()
Amino acid and Pseudo-amino acid composition
bioinformatics![AI-public-health]()
Multidisciplinary Perspectives on Artificial Intelligence (AI)
A.I![openai-codex]()
Ultimate Guide: Using ChatGPT in Computational Biology for Students 2023
A.I![Choosing the Right Bioinformatics Tool: A Student’s Guide to Informed Decision-making in Research]()
Choosing the Right Bioinformatics Tool: A Student’s Guide to Informed Decision-making in Research
bioinformatics![protein science]()
Protein Science in Bioinformatics: A Quick Guide to Sequence and Structure Analysis
bioinformatics![Bioinformatics glossary - Y]()
Bioinformatics glossary - Y
bioinformatics![Docker-bioinformatics]()
Docker for Bioinformatics Analysis
bioinformatics![Introduction to JavaScript for Bioinformatics]()
Introduction to JavaScript for Bioinformatics
bioinformatics![Omics data analysis]()
Sequence alignment techniques (pairwise and multiple sequence alignment)
bioinformatics![Novel corona virus]()
Bioinformatics for Novel Corona Virus-SARS-CoV-2/COVID-19
bioinformatics![ucsc-genome]()
Tutorial-Using the UCSC Genome Browser
genomics![metagenomics]()
What computational problems are encountered in sequence assembly?
genomics![Bioinformatics related Organizations and Associations]()
Bioinformatics related Organizations and Associations
bioinformatics![comparativegenomics]()
Exploring Genomic Diversity: An Introduction to Comparative Genomics
genomics![ChatGPT in healthcare and scientific applications]()
How Bioinformaticians Collaborate with Doctors and Clinics
bioinformatics![protein-molecular-dynamics]()
Comparing Virtual Screening with Bioassays Using PyRx: A Practical Guide
bioinformatics